Using Motion Tweening to Move a
Movie Clip Symbol
Movie Clip symbols are very powerful but a bit difficult
to understand. They are something akin to animations
that exist within your animation.
In this exercise you will be using a file that has a Movie Clip symbol already
prepared for you in the file's Library. The symbol is of a
character I call the Chomper. You will be creating
a motion tween to move him from one side of the background
to the other side, and then back again, creating the impression
that he is pacing back and forth.
All the while, the Chomper
will be gnashing his teeth up and down. The action of the
teeth gnashing is the animation that is built into the Movie
Clip symbol. The Chomper's movement from left to right and
back again, that you will be creating, is separate from the
gnashing.
I've also put play and pause control buttons in view that
will control the side to side motion that you
will be creating. These
buttons are on a locked layer so that you won't inadvertently
change them. They will work after you create your motion tweens
as described below.
The actions that you will be creating are:
- Make the Chomper character go a short
distance from left to the right.
- When he has moved a short distance to the right,
he will abruptly turn around and go back again
to where he started on the left.
- Then the entire action will
repeat itself.
Note that a Flash animation will run continuously, again and again, by
default:
- It
never stops unless deliberately set to stop.
- This means
that once the action reaches the last frame,
it starts again at the beginning.
- Because of this, one generally needs to
make animations so that they will successfully loop,
which means that when the last
frame is reached and the animation starts
immediately again at the first frame, the
animation will look smooth and the transition
inconspicuous.
Please take the following steps to make it happen:
-
First, view the following file in your browser for a preview
of what you will be creating:
motionTweenChomperCmplt.html
-
Next, download this Flash file to disk (PC users, right-click; Mac users, control-click):
motionTweenChomper.fla
- Open the file in Flash.
- Set your view so that you see the entire background:
- View
-> Magnification -> Show Frame
- You probably won't see anything
except the Play and Pause buttons on a blank white
background with gray around it.
- The white area is called the Stage and it represents
the area that will be seen in the final animation.
- Find the Chomper symbol in the file's
Library and click on its name to select it as follows:
- To open the file's
Library:
Window -> Library ...or F11.
- The Chomper is a movie clip symbol, which
means that it has some animation built into it already.
Movie clip symbols allow for an independent animation
within your main animation.
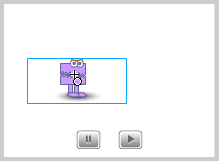
- You can preview the Chomper's self-contained animation
by selecting him in the Library and then clicking
on the little Play button to the right of the preview
image at the top of the Library panel.
- You will see that the Chomper's animation is limited
to him gnashing his teeth.
- In the Library you can also see the parts
that the Chomper is made up of:
- The jaw
movement is actually a motion tween within
the Movie Clip. The tween is of Chomper's top part going
up and down.
- All of his parts are symbols themselves.
- Symbols can be made of other symbols.
- You can see the other symbols in the Library.
- Chomper's
top section is a symbol that consists of a jaw
symbol and a symbol for his eyes.
- Creating a movie clip symbol
is beyond the scope of this exercise, however,
if your instructor has indicated that you have successfully
completed this exercise you can inspect the parts
by double-clicking on them to see them in the Symbol
Editor. Which leads me to making this warning...
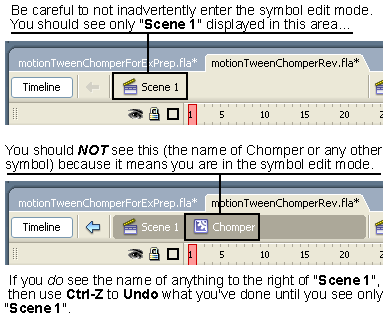
- WARNING! At no time do you want to inadvertently enter
the symbol editing mode.
- This is probably the most common
mistake that Flash beginners make.
- You do not want
to be editing the symbol instead of working on the overall
animation.
- The symbol edit mode can be easily entered by accidentally
double-clicking on a symbol, which many people do inadvertently.
- Use the illustration below to determine if you are in
the symbol edit mode.
- Be constantly vigilant about this. Refer to the illustration
often as there is always the chance that you could enter
the symbol edit mode unwittingly.
- There might not be any indication that you are in the
symbol edit mode other than what is shown in the following
illustration:
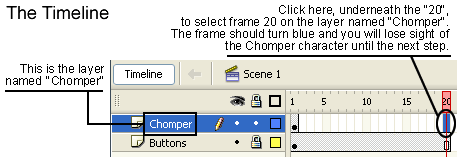
- Select the layer named Chomper by clicking
on it. The layer should turn blue.
- Drag an instance
of the Chomper out of the Library by:
- Click and hold down on your mouse button
on the picture of the Chomper in the Library.
- Then, keeping your finger pressed down on the mouse,
move your mouse over to the Stage area (the white area).
- Let
go of your mouse button when you're over the Stage.
- This will create an instance of the Chomper symbol
there.
- Using the Selection tool (the black arrow at the
top of the Tools panel)
position
the instance of the Chomper about half way up in the Stage area,
slightly to the left of the center of the Stage (see illustration).
-
- You should be on frame 20. This will be the last frame of your animation. When your Flash animation is displayed in a browser, it will automatically start again at frame 1.
- Make sure that the Chomper has a blue rectangle around
him. If not, click on him with the Selection (black arrow)
tool.
- Use the Modify menu
in Flash as follows to turn him:
Modify -> Transform -> Flip Horizontal
- In the Timeline panel, in the Chomper
layer, click on frame 9 to select it.
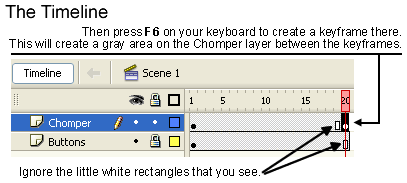
- Put a keyframe at frame 9 by pressing F6 on
your keyboard.
- Move the Chomper character slightly to the right of center.
- This will be the point that he stops on the right side before
turning around to go back to the left side.
- We are establishing the mid point of the animation.
- The Chomper should cover only a fairly short distance
otherwise the animation may not appear smooth.
- Next, click on frame 10 in the Timeline panel on the Chomper
layer.
- Put a key frame at frame 10 by pressing F6 on your
keyboard.
- Make sure that the Chomper has a blue rectangle around
him. If not, click on him with the Selection (black arrow)
tool.
- Use the menu in Flash as follows:
Modify -> Transform -> Flip Horizontal
- Select frame 1 on the Chomper layer in the Timeline panel by clicking under the "1".
- Press on Shift on the keyboard and then
click on frame 20.
- This ought to select all of the frames
from 1 through 20.
- Right-click on any of the selected frames and select Create
Motion Tween from the menu that appears.
- That should complete the work.
- Note that although you can preview the action of the left to right movement of the Chomper in Flash now using the Enter (or Return) key on your keyboard, the jaw action of the Chomper will not be visible there. Read on...
- Now, using the File menu, select Save As and give the new file the name: chomper_yourLastName.fla
- Press Ctrl + Enter to preview the animation in the Flash Player (which is also what a browser uses to view the animation).
- You should see a very agitated looking Chomper moving
from left to right.
- Test the Pause and Play buttons. The lateral movement
should stop when you press the pause button (the one
with the two stripes), however the mouth should continue
to go up and down, illustrating the fact that the gnashing
is a part of a Movie Clip symbol which means its animation
is independent of the file's overall Timeline panel.
- Please email me as an attached file your completed chomper_yourLastName.fla file. Or, if you can find it and you're pretty sure you did the exercise properly, send the chomper_yourLastName.swf file (notice the different file extension at the end) which you will probably find in the same folder as the .fla file.
That's all folks!
© 2006 Dan Hitchcock Vaughan and its licensors. All rights reserved.