Dreamweaver:
Creating Rollovers,
a Library Item and a Template
Note: These instructions are for Dreamweaver version 8 but they should work similarly on other versions.
Dreamweaver is one of the premiere html editing programs available
today. In addition to generating html, it also creates some
JavaScript and even some Flash text and buttons without leaving
the program. Dreamweaver also has an exceptional file management
system and an ftp utility to manage both
your local and remote web sites.
Let's explore the use of Dreamweaver's
Template and Library capabilities. These are
tools used to expedite the creation of Web pages and also
for updating those pages more easily whenever changes are
needed in the future.
In the process of learning about templates and library items
we will also be creating a set of rollover buttons. Rollover
buttons change when you roll your mouse pointer over them.
Dreamweaver generates both html and JavaScript to accomplish
them. A set of buttons used for getting around a web site
is usually called a navigation bar.
Templates
Dreamweaver template files are used to generate new files that look like the template. The files that are created can be modified to the
extent permitted by settings specified within the
template file. Dreamweaver templates are a lot like
the templates you may have already used in programs such
as Microsoft Word or Excel and the procedure for creating them
is about the same.
Typical uses of templates in Word are
letterheads, memos, and envelopes. In Dreamweaver, templates are used to rapidly turn out pages
that are identical in most ways, but have differences in one
or more specific areas. This can include pages used to display
information such as individual items for sale or the biographies
of each member of a company's management team.
These types
of pages would probably be expected to look almost the same
except for a photo of the item for sale (or of the manager
in the case of the latter) and the text related to it.
Top
Note: The following section ("The General Proocedure") describes in a general way how a procedure is accomplished. It is not intended to be step by step instructions. The steps for you to follow to complete this exercise will begin in the section: Get Dreamweaver, Set Your Resolution, Get the Files and Folders. It ought to be obvious when you get there what steps to take.
The General Procedure
The process for creating a template is straightforward. First,
you create a file with the objects, formatting, and layout that you want
to use as the basis for future files. Then, you select from
the File menu: Save as Template...
An important difference between Dreamweaver and Word
templates is that with Dreamweaver you need to designate certain
areas as being changeable (editable) and
others as not editable (which is the default).
This prevents you
from inadvertently modifying those parts of a file derived
from a template that you may not want changed, such as navigation
buttons, background color, logo, a company email link, etc.
It's an important concept to grasp because, unless you designate
otherwise, no part of a file made from a Dreamweaver template
can be changed.
After creating the template, whenever you want to create a new file that uses the template
file as its starting point, begin by using File -> New
-> and then in the New Document dialog box that
opens, select the Templates tab ...then select the template
you want to base your new page on.
A new file would open that would
be identical to the template, however you would not be able
to modify anything but those sections previously designated
as editable
regions. Changes made to the derivative file would not
affect the original template file of course. To modify the
template itself it is necessary to modify the original template
file.
We will be making a template as a part of this exercise.
Library Items
 We
will also save as a library item a group of four rollover
buttons (a navigation bar) that we will create. Library items
in Dreamweaver are parts of a page that you save as a separate special file. You can then use the library item on many different pages.
We
will also save as a library item a group of four rollover
buttons (a navigation bar) that we will create. Library items
in Dreamweaver are parts of a page that you save as a separate special file. You can then use the library item on many different pages.
The difference between a
library item and a template is that a template provides a complete
html file and a library item is a part of a
file. Library items can be things such as buttons, tables, banners, or a group of text links such as the ones you often find at the bottom of a web page.
Dreamweaver saves templates as .dwt files and
library items as .lbi files. As soon as you create
one or the other, a folder is automatically created by Dreamweaver
to contain it named (not too surprisingly) Templates or
Library respectively. You will find these folders in what Dreamweaver
asks you to define as your site's local root folder,
which we will discuss in a minute.
Templates and library items are similar in that when you change
the original template or library item file, every instance
(each use) that has been derived from it can be updated
simultaneously, with your approval. This simplifies making
global modifications of your site's files.
For example, if you change the
address of a link in a navigation bar in your library,
then all pages using that same library item will be updated
as well. Note
that in the case of many if not most scenarios, any files
that have been affected will be changed only on your computer
(in your "local site") and not on the server, which is where
copies of the files that you work
on are usually made available for the world to access. Those files will need
to be updated as well. Dreamweaver provides various means
for doing that.
Top
Get Dreamweaver, Set Your Resolution, Get the Files and Folders
 First
of all, if you haven't downloaded Dreamweaver version 8, please
do so: Macromedia
Dreamweaver 30 day trial download
First
of all, if you haven't downloaded Dreamweaver version 8, please
do so: Macromedia
Dreamweaver 30 day trial download
Monitor Resolution
Make note that
Dreamweaver recommends that you set your monitor resolution
to be at least 1024 x 768. Otherwise, you may not be able to
see all of the parts of the interface. Those of you
with 17 inch monitors may have your monitor set to 800 x 600.
To check or change your resolution, using Windows:
- Start button -> Control Panel -> double click on Display
- This opens the Display Properties dialog box.
- Setting tab -> Screen Resolution
- Move the slider until it says 1024 by 768 pixels
- Click on OK
- It might take a few moments for the setting to be completed
during which time your screen might go black.
Getting the Files You Need :
You can download a zip file that contains all the files you need for this exercise from this link. Save the file to your computer and then double click on it to extract the files:
StudentFiles.zip
To save the files from either an email attachment or from the browser link (above):
Windows users:
- Right-click on the link in your browser or on the email attachment.
- Select Save Target As, (or Save As, or similar) making note of where you are saving the file.
- Find the file using My Computer.
- Right-click on the file.
- Select Extract All.
Mac users:
- Control-click on the link.
- Select Download Link to Disk (or a similar command such as Save Attachment if you are using an email program such as Entourage) making note of where you are saving the file to.
- Find the file using Finder.
- Double-click on the file. The contents should self-extract.
"Permission" Problems?
Note that when you first try to open the basic.html file in Dreamweaver, you may get a message that asks you if you want to "Make Writable" the file. Agree to this. In other cases, if you have any problems when you try to save the file, it may be due to permissions.
To alleviate this problem if it occurs:
Windows users:
- Find the file in My Computer.
- Right click on the file's icon.
- Select Properties from the bottom of the menu.
- In the dialog box that opens, in the General tab section, uncheck the Read Only check box.
Mac Users:
- Find the file in Finder.
- Select it.
- Press the Command-i keys on your keyboard (this provides "information")
- At the bottom of the Info box that appears, set the Ownership & Permissions so that you can Read & Write.
Where to Put The Files
-
The files you need ought to now be available.
-
Create
a folder named rooftop in a location where you can easily find it again.
- The files that you donwloaded are probably already in folders.
- If so, the folders are named html and images.
- If not, then create two folders with those names.
- Put those two folders (html and images) inside the rooftop folder.
- The file basic.html - needs to be in the folder named: html.
- The following files need to be in the folder: images:
- home_logo.gif
- sun_large.gif
- Check inside the images folder to see if there is a folder named navigation. If not, create one there.
- The following files need to be in the navigation folder if they aren't there already: put all of the files that start with "nav_" in
the navigation folder (which should be inside
of the images folder).
Note:
- There should be 8 nav_ GIF
files (4 pairs) in all.
- These GIF files were created in Fireworks and will
be used for our rollover buttons.
- Each pair has an ORIG and
an OVER file (these terms correspond to
a dialog box you will be using when creating the rollovers).
- The ORIG image
is the default image, that is, the way the button
looks normally.
- The OVER image is the image that
will appear when the mouse pointer rolls over
the button; the text glows.
Top
Local Root Folder and the Cache
We will be defining a local root folder in a moment.
First, an explanation about this. One of the most important
things to do when using Dreamweaver is to create a folder on
your computer and then designate that folder as the local
site.
A local site is nothing more than a folder that you create on your computer that will be used to contain all of the files associated with one web site. This includes your local copy of files that ultimately get put on the remote server for the world to see.
You can keep any files at all in it, such as related MS Word documents, not just HTML, GIF and JPEG files. For example, you can store original image files, text files from your clients, production checklists, etc., in it. Ultimately you will also use it for uploading to the remote server the files that you want to make available to the Web.
Creating a local site allows Dreamweaver to track file movement. It can then update any affected links in the code for you automatically whenever you move
a file or change a link on any page in your site. Dreamweaver
can update all affected links. Otherwise you would need
to manually go to each file and change the links in it, which
can be a huge undertaking fraught with the risk of forgetting
to change some affected code.
In order to accomplish this, Dreamweaver
generates a cache of
information about the files and folders in the site and the
relationships between them (links, paths, etc.).
Top
Define the Site
Launch Dreamweaver. First you will define the site.
- Using Dreamweaver's main menu bar go to:
Site -> New Site
- The dialog box: Site Definition for Unnamed
Site 1 will open.
- At the top of the dialog box, select the tab named Advanced
- On the left side, select Category: Local Info
- Enter these items:
- Site Name: Rooftop Restaurant (note:
the name of the dialog box now changes to Site Definition
for Rooftop Restaurant)
- Local root folder:
- Click on the little folder icon to the right of
the Local root folder selection window.
- This dialog box should open: Choose local root
folder for site Rooftop Restaurant
- Navigate to the folder you created named rooftop
- Double click on it to select it:
- The selection box near the top of the dialog
box should now say Select. You
ought to see the name of the folder rooftop in
the Select box.
- Also, in the lower left corner it should say Select:rooftop
- In the lower right corner, the Select button
ought to be available.
- Click on Select
- Default images folder:
- Next, click on the little folder icon next to the Default
images folder selection box. Navigate
to the images folder
that you created inside of your rooftop folder.
- Select it in the same manner that you selected
the rooftop folder a moment ago.
- Leave all other settings as they are.
- Click OK to close the Site Definition dialog box.
- Then in the Manage Sites dialog box click on Done
- A message might pop up regarding cache. Agree
to cache; it will enable Dreamweaver to control
file management.
Top
Designating a Preview Browser

Dreamweaver makes it easy for you to see your html file
in a browser. Even though Dreamweaver does a fairly good
job of displaying what your pages will look like in a browser,
you can never
be really certain how your file will appear until you open
it in an actual browser.
This can be particularly true
with web pages that use what are called Cascading Style Sheets
as well as JavaScript.
Consequently, it is a good idea to make a habit of routinely seeing what
your page actually looks like in one or more different types of browsers.
That way you can be confident that your work displays
the way you intended it to. You should check your page in a browser almost as often as you save your file, which ought to be done frequently in the event of a crash.
Let's make sure that you are set up in Dreamweaver for previewing
your work in a browser easily. Note that this may already be
properly set up in your copy of Dreamweaver, therefore don't be surprised
if these settings have already been established:
- In the Dreamweaver menu bar select File
-> Preview in Browser -> Edit Browser List
- The
Preferences dialog box will open set to the Category of:
Preview in Browser
- Click on the Edit button.
- The Edit Browser dialog box opens.
- In the Application field, click on the Browse button
to navigate
to your Internet
Explorer program, which
you will probably find in a folder named something similar
to Program Files on your C drive.
- Select the program, which will probably be named something
innocuous such as iexplore.exe
- Then click Open (which is a misnomer, you are actually
selecting it).
- This will return you to the Edit Browser dialog
box.
- For Defaults: enable Primary browser
- This will allow F12 to function as a hot key to trigger previews in your browser.
- Click
OK
- This will return you to the Preferences dialog
box.
- Be sure to enable Options: Preview using temporary file.
- This allows Dreamweaver to preview your work
in the browser without having saved the file or any changes
that you have made to it.
- Click OK to accept the choices that
you have made.
The Preview in Browser options allow you to preview
your web pages in a wide variety of browsers, which is always
a good idea. In order to do this you need to first have those
browsers on your computer.
You can usually
find downloads of older browser versions at the Microsoft,
Netscape, and other web sites, but you may need to dig deeply
because some publishers are not in the habit of encouraging
the use of their older browsers, although they usually provide
them for web developers (like you!). Don't forget that the truly professional developers will also test on Macs and even UNIX/LINUX platforms using different operating system versions and browsers.
Now, using Dreamweaver's File menu, open the file basic.html.
(If you are asked, agree to make the file Writable, or see the Permissions section above.)
Press F12 on your keyboard.
This file ought to now open in
your browser.
Top
Making an Image Into a Link Using the Properties Panel
Click on the image of the banner at the top of the page. You will be able
to tell if the image is selected:
- If there are little black handles on the edges
of the image on the far right side.
- If the Properties panel has on its left side: Image along
with a small image of the banner.
- If you don't see the
Properties panel (which is usually at the bottom of Dreamweaver's
interface) then go to Window -> Properties or
else simply Ctrl + F3.
The Properties panel
is what you will probably find to be the most useful part of Dreamweaver.
The Properties panel changes depending
on where the insertion point is or what is selected at the
time.
Make note that there is a little white triangle in the lower
right corner of it. You may not see it if your monitor is still set
to less than 1024x768 (see notes mentioned previously).
Click on the white triangle a
couple of times. It allows you to expand or collapse additional
options that may be available in the Properties panel. I recommend that you leave the
Properties panel open to the largest size.
With the image selected, the Properties
panel will offer options related to it. You will notice an
empty Link box. Fill this in with the
URL of a site you like. You need
to include
the transfer protocol (http://) at the beginning of the web address. For example, you might enter this:
http://www.google.com/
After you type in the URL, press on the Enter key. Be
forewarned that the page may all of a sudden shift to the left.
That's OK. Use your scrollbars to return to viewing the left
side of the page once again.
Directly underneath the Link box is a Target box. Targets
are for controlling where the file specified by the link
will open. Probably the most useful one is _blank.
It's an odd name, particularly with the required preceding
underscore. It causes the link to open a new browser window
and to have the linked page open in that new window. Select Target:
_blank
Now click
on F12 on your keyboard. This should open the page in
your browser. If you move your pointer over the banner, the
pointer will turn into a pointing hand icon, indicating the
presence of a link.
Click on it. The link ought to open in
a new window. When done, return to Dreamweaver.
Top
Library Items
Next, we will be creating rollover buttons and putting them
in the small table in the vertical column on the
left side of the page. We will not create links
for these rollovers now, however the rollover effect will work.
Links could be added later.
Then we will save the table containing the rollover buttons
in Dreamweaver's Library. We do this because if
we wanted to create any new pages for this site, many of them
may be able to employ the navigation
bar we will save in our Library. We would not need to recreate it for every page. Instead,
we can literally just drag a copy of it out of the Library
and put it on the page where we need it.
Furthermore,
if we wanted to change anything about all of the uses
of one library item, all we would need to do is
to change the original library item's file. Then all derivative
uses of it would change as well (our permission would be asked
for first).
For example, when the time came to apply links to the
buttons we are about to make, we would only need to apply the
links to the buttons in the library item. Then all instances where
the library item is used could be automatically updated to include the new links or any other
changes that are made, all at
the click of a button.
However, this would only modify
the files in your local site, that is, on your computer. The
files on the remote server would still need to be updated.
Top
Rollover Buttons
What Dreamweaver needs to create a rollover image is actually
two alternating images: the Original (normal) image and the Over image, which is the one
that appears when you move your pointer on top of the button.
Note that the Original image is sometimes called the Up image. As one
might expect, the two images that are used need to be the same size.
Dreamweaver
creates JavaScript code to make the rollovers work. We will now fill the four cells with rollovers, inserting
one rollover per cell, using the instructions
that follow. The sequence of the rollover buttons will be, top
to bottom:
- catch
- gourmet
- rave
- special
Top
Here's How To Do It
- Click at the end of the text in the top cell, to the right of the period; it is the cell that has the text in it that says: put first
rollover here (Catch).
- A flashing insertion bar should now be visible to the right
of the words, as illustrated.
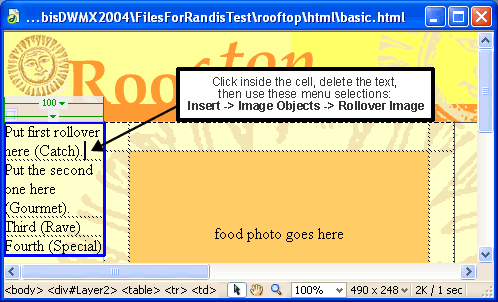
- Delete all the text in that cell. All that should remain in
the cell is the insertion point.
- Execute these menu commands:
Insert -> Image Objects -> Rollover Image
- In the resulting dialog box (the Insert Rollover Image dialog) leave
the Image name as is. This is used by JavaScript but you don't need
to be concerned with it for this exercise.
- For the Original image, click on the Browse button. Search
for the images/navigation folder.
- From there, select the file: nav_catch_ORIG.gif
- For the Rollover image select nav_catch_OVER.gif
- Enable Preload rollover image.
- This means that the
browser is being instructed to request, and then download
into its cache when the page is initially loaded, the image that will be used
for the rollover's "over" image. That way, there will be no delay waiting
for the image to download before appearing when the visitor moves their mouse
over the rollover.
- FYI, in Internet Explorer for Windows the cache is
called Temporary
Internet Files and can be found in the browser's Tools menu
under Internet Options.
- Click OK without filling in the other boxes.
- The rollover effect will not be visible in Dreamweaver.
- Click on F12 to test the rollover effect in the browser.
- NOTE: if the rollovers do not work in Internet Explorer, and a yellow band appears at the top of the browser window that states: "To help protect security, Internet Explorer has restricted this file...", then click on that yellow band and then agree to Allow Blocked Content and to "run active content". This is an error that occurs when you view html files with certain JavaScript and other code from an html file that's on your computer. This should not happen when such a file gets uploaded to a server.
- Congratulations, you have just made your first rollover (and generated
JavaScript code to go with it)!
- Follow this same procedure in the three remaining table cells,
removing the text and any spaces from each cell before you insert the images for each cell.
Top
Making the Library Item
Next, we will select the part of the page that we want to
convert into a library item namely, the navigation bar of rollover
buttons that you just created including the table they are
in. We will pretend that we will need to use it on multiple pages
at our web site.
How do we select the navigation bar? It currently has two containers: a table
(with the four cells) which is inside of what Dreamweaver calls a layer.
Layers define a specific location on
a page, tables do not. Therefore, we want to select the
table in the event that we may want the navigation bar in slightly
different positions on different pages. If we save the layer
code as a part of our library item and then used an instance of
that library item, we would find that we couldn't move it once
we put it on the page.
- To select the table that has the rollover buttons in it,
and not the layer, first click on any of the button images that you just inserted
(nested)
inside the table.

- Then select the <table> tag in the Tag Selector area
at the bottom of your file's window. The Tag Selector displays
a row of html tags (see illustration). It is handy
for easily selecting objects on the page that might otherwise
be difficult to select.
- This is one of the most important areas to be aware of in Dreamweaver
as it can greatly facilitate selecting a tag and all the tags that
are nested within it.
- When you click on <table> it means that you have selected
the entire table and its contents (the rollover buttons).
- The tag in the tag selector will be highlighted.
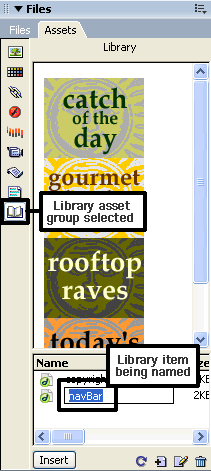
- From the main menu bar select: Modify -> Library -> Add Object
to Library
- This should open up the Assets panel.
- If the Assets panel does not open, then press F11 on
your keyboard until you see it open.
- In the Assets panel, the Library group ought
to be selected. It is the icon of a little open
book at the bottom of the column of icons on the left edge
of the Assets panel (see illustration).
- If not, click on the icon to select it.
- Your new navigation bar ought to be visible in the Library. The name of it (Untitled)
should be highlighted, waiting for you to type in a name for it. Type
in and name it navBar.
- Note: If it is not highlighted, it is probably named untitled.
It is easy to rename it: right click on the word untitled and in
the menu that appears select Rename. Then type in the name navBar.
A dialog box may open asking you to approve updating: approve of it.
Dreamweaver will automatically create a new folder in the site root folder
called Library and will put this library item in it using the extension: .lbi (library
item).
Top
Converting Layers to Tables
In the section after this you will convert the file so
that it replaces Dreamweaver's layers with tables. This can
be a good thing to do because some of the much older browsers
(those older than version 4) cannot understand Dreamweaver's
layers because they use the <DIV> tag.
The file currently has three
layers. The layers have been useful assembling the parts
of the page because they simplified the positioning of items
thus expediting the creation of a nice composition.
Converting layers to tables is very easy with Dreamweaver.
You can also convert tables back to layers if you want to use
them again later to make readjustments to the page composition.
The conversion process usually results in a faithful representation
of the original page that was made with layers, but
it doesn't always.
There is another potential problem,
and that is if any of your layers are overlapping, even a tiny
bit, then Dreamweaver will not permit the transition.
The Overlapping Layers Detected dialog box may open,
sometimes listing the offending layers. Or you may get the
error message "This file cannot be made
compatible with version 3 browsers because it contains layers
that are partially off screen".
If you get error messages
such as those just mentioned, then you will need to follow
these steps, but
there is no need to do so unless you have such error messages.
If you get such an error message, you will need to move the
offending layer(s) so that they don't overlap or are not partially off screen:
- Again, there is no need to do these steps unless
you get the error(s) just mentioned when executing the
steps in the next section.
- Close the error message.
- Open the Layers panel by pressing F2 on
your keyboard or using the menu bar: Window
-> Layers.
- The Layers panel will open. It lists the layers in your
file. There are probably three.
- Near the top of the Layers panel, enable the Prevent
overlaps checkbox.
- This will not remove existing overlaps, but
it will prevent them from happening in the future.
- Select the layers in the Layers panel one at a time and
then use the arrow keys on your keyboard to reposition the
layers until they are no longer overlapping the other layers.
- It might be hard to tell if a layer is overlapping
another particularly if the overlap is very small, for
example just one pixel.
- I think that the only way to be certain that
you have successfully repositioned the layer(s) is to follow
the procedure in the next section a second time and see if you
get an error message once more.
- Once you have corrected any layers from overlapping,
and the Prevent Layer Overlaps checkbox
is enabled, you can no longer overlap layers in the future,
which is good in this case.
- In fact, if you are planning
on delivering pages that are layer-free, it is
a good idea to enable this checkbox before you
begin to create your pages.
- It can also be enabled
using Modify
-> Arrange -> Prevent Layer Overlaps
Next, on to the "conversion ceremonies"!
Top
To Convert Layers Into a Table
- From the main menu bar select: Modify -> Convert
->
Layers to Table...
- A dialog box called Convert Layers to Table will
open.
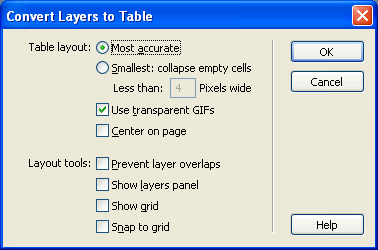
- Accept all the default settings.
- Click on OK.
- If you get error messages, see the preceding section in
this tutorial.
You've done it (I hope...)! The layers will no longer be there:
a table has replaced them and the page ought to look similar
to the way it looked before, or else very close to it. Press F12 on
your keyboard to preview the page. All the rollovers should
continue to work.
One final step is needed. By default, html will always include
a border around a page. Layers preclude this by using
absolute positioning which permits the specification
of a location at precise coordinates in a browser window. But
your page probably has margins now when displayed in the browser.
To prevent the margins using html, you will need to set the html
body tag margin attributes and there are two pairs of them,
one for Internet Explorer and one for Netscape. Please do the
following:
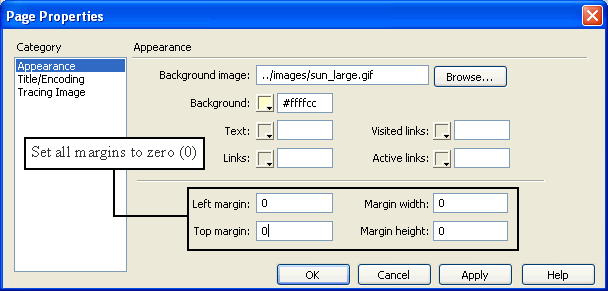
- In the menu bar: Modify -> Page Properties...
- The Page Properties dialog box will open.
- On the left side, select the Category: Appearance if
it isn't already selected.
- In the lower part of the dialog box, set all four margin
settings to 0 (zero - not the letter "O"!).
See illustration.
- Then click OK and your margins ought to be gone,
leaving the page looking almost precisely as it had appeared
using layers.
Top
Create a Template
Next, we will make our page into a template so that we can
easily create new pages based on it without having to totally assemble
them. Our page is intended to be for displaying
dinner specials. There may be many of these special dishes
that you would want to have web pages available for. Using
a template will make this much easier.
- From the main menu bar select: File -> Save
as Template
- The Save as Template dialog box will open.
- In the
text box at the bottom that is labeled Save as name it: special.
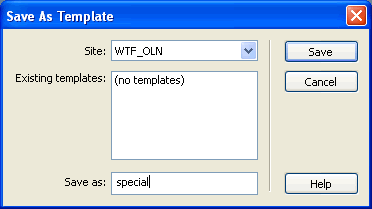
- Click on Save.
- Open the Assets panel by using the
menu bar: Window
-> Assets or press F11 on your keyboard.
- In the Assets panel, select the Template asset
group. This is represented by an icon of a page of
paper and is one icon above the Library's book icon.
- If you don't see your new special template, click
on the
Refresh Site List button at the bottom of the Assets
panel (see illustration) and it should appear.

Dreamweaver will save the template as a file with the file
extension .dwt (DreamWeaver Template).
Dreamweaver will also automatically create a new folder named
Templates (that is, if one had not yet existed, and
in your case it probably didn't) in
your site's root folder and put your new template file
in it.
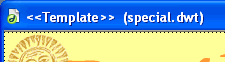
The upper left corner of the template file (as it appears
if the file is not maximized):
Top
Designate an Editable Region

Unless
you specify areas of a Dreamweaver template to be editable,
you will not be allowed to modify the files made from a template
at all, with the exception of changing the page's html title
(the text that appears in the title bar).
Therefore, you need
to specify the parts of the pages derived from the template
that you want people to be able to change. These need to be identified as Editable
Regions.
In our template there are two areas that we would want to
be able to modify in files derived from this template.
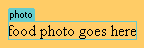
Each is a table cell. The two cells are in the middle
of the page, colored orange and very dark brown, and they have
labels typed inside of them. To make them each editable, follow
these steps for each of the two cells:
- We will start with the upper cell: click inside the upper (orange) cell.
- Select the furthest right <td> (cell) tag
in the Tag Selector (the area at the bottom of the
image window where you previously had selected the table
tag). Be sure to open the window wide enough to see all of
the tags - make sure you select the <td> tag
furthest to the right.
- From the main menu bar select: Insert -> Template Objects
-> Editable Region
- In the New Editable Region dialog box that opens,
supply the name for the editable region: photo
- Save the template file (File -> Save).
- Repeat the steps for the cell underneath it: the food description cell. Click anywhere inside that cell first, then follow steps 2 through 5, however name the lower
editable region description.
Top
Making a File From a Template
Let's make a new file from the template just to make sure
it works:
- From the main menu bar select: File -> New
- The New Document dialog box opens.
- At the top left of it click on the Templates tab.
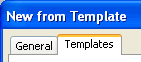
- Your new template special should be listed.
- Select it.
- Click on Create
- When the new file opens you will see the NO symbol
(a circle with a diagonal line through it) appear instead
of an arrow almost everywhere your mouse pointer goes except
over the two cells that you had made editable.
- Click inside the cell for the photo.
- If you wanted to you
could now insert an image of food here. However there is no need for
you to do this, so please don't bother.
- Then click in the lower cell and type in your own description
of a favorite dish of yours.
- Press on F12 to preview the page in the browser.
- Check
that the rollovers work.
- Save the new file as: ROL_yourlastname.html
- Online Blackboard students, send me the file via email.
Congratulations. That's it. I hope you enjoyed making rollovers,
a library item and a template. This is what a final page from
the template might look like if an image of food had been added:

Only after you have finished this exercise,
those of you who know some html may want to now investigate
the code that Dreamweaver generated. You can do this using
the keyboard combination of Ctrl
+ ` (that
second character's key is in the upper left corner of your
keyboard, under the
Esc key). Pressing on this keyboard combination will
toggle you from Code view to Design view
and back again. If you select an object in Design view, then
the code for it will be highlighted in the Code view. Try changing
some of the code if you know how, and see what happens. Have
fun.
Top
Copyright © 2004 Dan Vaughan and its licensors. All rights reserved.