 We will also create a library item from
of a set of rollover buttons (a navigation bar) that we will create.
Library items in Dreamweaver are parts of a page that you save
and then reuse on the same or other pages.
We will also create a library item from
of a set of rollover buttons (a navigation bar) that we will create.
Library items in Dreamweaver are parts of a page that you save
and then reuse on the same or other pages.Dreamweaver is one of the premiere html editing programs available today. In addition to generating html, it also creates a limited amount of JavaScript, and even lets you create Flash buttons without leaving the program. Dreamweaver also has an exceptional file management system and ftp utility that works with it to manage both your local and remote web sites.
Let's explore the use of Dreamweaver's template and library capabilities. These are tools used to expedite the creation of Web pages and also for updating those pages more easily whenever changes are needed in the future.
In the process of learning about templates and library items we will also be creating a set of rollover buttons. Rollover buttons change when you roll your mouse pointer over them. Dreamweaver generates both html and JavaScript to accomplish these. A set of buttons used for getting around a web site is called a navigation bar.
A template is used to generate prefabricated files. The files that are generated can be modified to the extent that is permitted by limitations specified within the template at the time the template was created.
Dreamweaver templates are a lot like the templates you may have already used in programs such as Microsoft Word or Excel and the procedure for creating them is about the same. Typical uses of templates in Word are letterheads, memos, and envelopes.
In Dreamweaver, templates are used to rapidly turn out pages that are identical in most ways, but have differences in one or more specific areas. This can include pages used to display information such as individual items for sale or the biographies of each member of a company's management team. These types of pages would probably be expected to look almost the same except for a photo of the item for sale (or of the manager in the case of the latter) and the text related to it.
TopThe process for creating a template is straightforward. First, you create a file with the formatting and layout that you want to use as the basis for future files. Then, you select from the File menu: Save as Template.
An important difference between Dreamweaver and your standard Word or Excel template is that with Dreamweaver you can designate certain areas as being changeable (editable) and others not editable (the default). This prevents you from inadvertently modifying those parts of the file that you may not want changed such as navigation buttons, background color, logo, email link, etc.
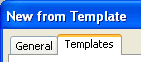
Whenever you want to create a new file and use a template file as your starting point, you use File -> New -> select the Templates tab ...then select the template you want to base your new page on.
A new file would open that would be identical to the template, however you would not be able to modify previously designated sections of it (the non-editable regions). Your changes would not effect the template file itself. To modify the template itself it is necessary to modify the template file.
We will also create a library item from
of a set of rollover buttons (a navigation bar) that we will create.
Library items in Dreamweaver are parts of a page that you save
and then reuse on the same or other pages.
The difference between a library item and a template is that a template provides an entire html page but a library item is just a part of a page. Library items can be things such as buttons, tables of images, or even sounds.
Dreamweaver saves templates as .dwt files and library items as .lbi files. As soon as you create one or the other, a folder is automatically created to contain them. You will find these folders in the top folder level of your site (your root folder).
Templates and library items are similar in that when you change the original template or library item file, every instance that has been derived from it can be updated with your approval. This makes it easy to make global modifications. Note however that the files that have been affected will need to be uploaded to your remote site.
Top First of all, if you haven't downloaded Dreamweaver MX 2004,
please do so: Macromedia Dreamweaver 30 day trial download
First of all, if you haven't downloaded Dreamweaver MX 2004,
please do so: Macromedia Dreamweaver 30 day trial download
Create a folder named rooftop. Then create within it two other folders named: images and html. Within the images folder, create a sub-folder called navigation. Online students, get the following files from your Digital Drop Box* and place them in the folders specified:
* Online students: when saving from the Digital Drop Box, follow these instructions:
We will be defining a local root folder in a moment. First, an explanation about this. One of the most important things to do when using Dreamweaver is to create a folder on your computer and then designate it as the local site.
This is a step that allows Dreamweaver to handle file tracking and updating for you almost automatically. In order to accomplish this, Dreamweaver generates a cache of information about the files and folders in the site and the relationships between them (links, paths, etc.).
A local site is nothing more than a folder that you create that will be used to contain all of the files associated with the web site that you are creating. You can keep any files at all in it, not just your html, gif and jpeg files.
For example, you can store original image files, text files from your clients, production checklists, etc., in it. Ultimately you will also use it for uploading to the remote server the files that you want to be available on the Web.
Launch Dreamweaver. First you will define the site.

Dreamweaver makes it easy to allow you to see your html file in your browser. Even though Dreamweaver does a fairly good job of displaying what your pages will look like in a browser, you can never be really certain what your file will look like until you open it in an actual browser.
This can be particularly true with web pages that use what are called Cascading Style Sheets as well as with the display of JavaScript functionality. Consequently, it is a good idea to make a habit of seeing what your page actually looks like in one or more browsers. That way you can be confident that your work displays the way you intended it to.
Let's make sure that you are set up in Dreamweaver for previewing your work in a browser easily. Note that this may already be properly set up in your Dreamweaver, therefore don't be surprised if these settings have already been established:
The Preview in Browser options allow you to preview your web pages in a wide variety of browsers. In order to do this you need to first have those browsers on your computer.
You can usually find downloads of older browser versions at the Microsoft and Netscape web sites, but you may need to dig deeply because these publishers are not in the habit of encouraging the use of their older browsers, although they usually provide them for web developers (like you!).
Now, using Dreamweaver's File menu, open the file basic.html. Press F12 on your keyboard. This file ought to now open in your browser.
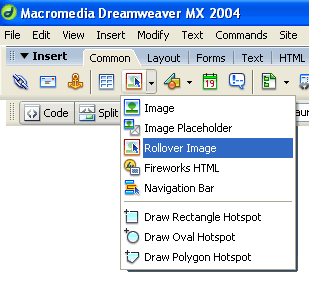
TopClick on the image of the banner at the top of the page. You will be able to tell if it's selected if:
Then look in the Properties panel which should be at the bottom of the Dreamweaver interface.
If you don't see it there, go to the Dreamweaver menu bar and select: Window -> Properties (or Ctrl-F3). The Properties panel is what you will probably find to be the most useful part of Dreamweaver.
The Properties panel changes depending on where the insertion point is or what is selected at that time. Make note that there is a little white triangle in the lower right corner of it. Click on it a couple of times. It allows you to expand or collapse additional options that may be available. I recommend that you leave the Properties panel open to the largest size.
With the image selected, the Properties panel will offer options related to it. You will notice an empty Link box. Fill this in with the URL of a site you like. You need to include the transfer protocol. For example, you might enter this: http://www.ucla.edu.
After you type in the URL press on the Enter key. Be forewarned that the page may all of a sudden shift to the left. That's OK. Use your scrollbars to return to viewing the left side of the page once again.
Directly underneath the Link box is a Target box. Targets are for controlling where the file specified by the link will open. Probably the most useful one is _blank.
It's an odd name, particularly with the preceding underscore. It causes the browser to open a new window and to have the linked page open in that new window. Select Target: _blank
Now click on F12 on your keyboard. This should open the page in your browser. If you move your pointer over the banner, the pointer will turn into a pointing hand icon, indicating the presence of a link.
Click on it. The link ought to open in a new window. When done, return to Dreamweaver.
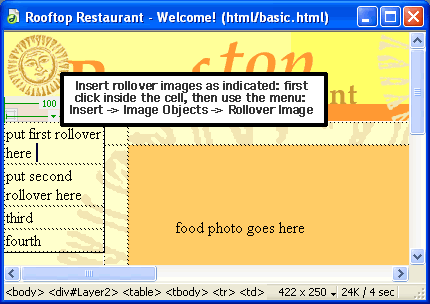
Next, we will be creating rollover buttons and putting them in the small table in the vertical column on the left side of the web page. We will not create links for these rollovers now, however the rollover effect will work. Links can be added later.
Then we will save the table containing the rollover buttons in Dreamweaver's Library. We do this because if we were to create new pages for this site, many of them may be able to employ this new library item as a navigation bar. We would not need to recreate it each time it's needed. Instead, we can literally just drag a copy of it out of the library and put it on the page where we need it.
Furthermore, if we wanted to change anything about all of the uses of a particular library item, all we would need to do is to change the original library item's file. Then all derivative uses of it would change as well (our permission would be asked first).
For example, when the time came to apply links to the buttons we are about to make, we would only need to apply the links to the buttons in the library item. Then all instances where the library item is used could be automatically updated at the click of a button to include the new links or any other changes that are made.
What Dreamweaver refers to as a rollover image is actually two alternating images: the Up, or regular image and the Over image, which is the one that appears when you move your pointer on top of the rollover. As one might expect, they both need to be the same size. (The Up image is sometimes called the Original image.) Dreamweaver creates JavaScript code to make the rollovers work.
We will now fill the four cells with rollovers, inserting one rollover per cell, using the instructions that follow. The sequence of the rollover buttons will be, top to bottom:
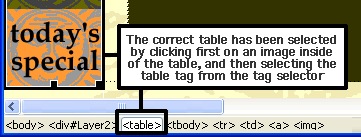
Next we will select the part of the page that we want to convert into a library item: the navigation bar. We intend to use it on multiple pages.
How do we select the navigation bar? It actually has two containers: a table (with the four cells) which is inside of what Dreamweaver calls a layer.
Layers use code that define a specific location on a page, tables do not. Therefore, we want to select the table in the event that we may want the navigation bar in slightly different positions on different pages.
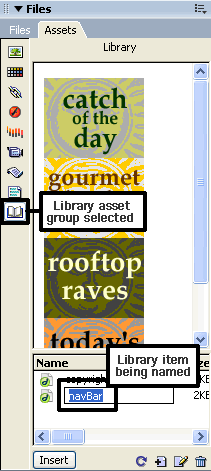
Dreamweaver will automatically create a new folder in the site root folder called Library and will put this library item in it using the extension: .lbi (library item).
Now we will convert the file so that it is made up entirely of tables. That's because some of the much older browsers (those older than version 4) can't see what Dreamweaver's layers. They had been used to position and compose most of the parts of the page.
The file currently has three layers. The layers have been useful assembling the parts of the page because they simplified the positioning of items thus expediting the creation of a nice composition.
Converting layers to tables is very easy with Dreamweaver. You can also convert tables back to layers if you want to use them again later to make readjustments to the page composition.
There is one thing that may cause a problem, and that is if any of your layers are overlapping, even a tiny bit, then Dreamweaver will not permit the transition. Dreamweaver will tell you which layers are overlapping.
If you get that message, you will need to slightly move the offending layer(s) so that they don't overlap:
You've done it! The layers will no longer be there: a table has replaced them and the page ought to look identical to the way it looked before, or close to it. Press F12 on your keyboard to preview the page. All the rollovers should continue to work.
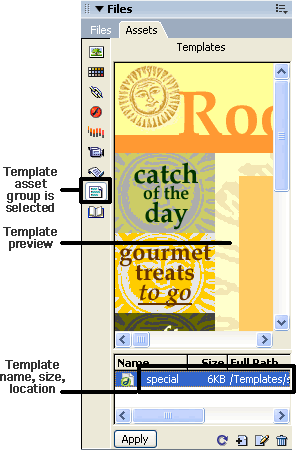
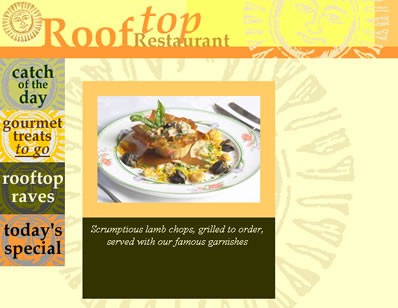
TopNext, we will make our page into a template so that we can easily create new pages based on it without having to assemble them from scratch. Our page is intended to be for displaying dinner specials. There may be many of these special dishes that you would want to have web pages available for. Using a template will make this much easier.
Dreamweaver will save the template as a file and add the file extension .dwt (DreamWeaver Template) to it. Dreamweaver will also automatically create a new folder called Templates in your site's root folder and put this new template file in it.


Unless you specify areas of a Dreamweaver template to be editable, you will not be allowed to modify the files made from a template at all, with the exception of changing the page title. Therefore, you need to specify which parts of the page you want to be able to change.
In our template there are two areas that we would want to be able to modify in any of the files derived from this template. Each of these are table cells. The two cells are in the middle of the page, colored orange and green, and they have labels typed inside of them. To make them each editable, follow these steps for each of the two cells:
Let's make a new file from the template just to make sure it works:
Congratulations. That's it. I hope you enjoyed making rollovers, a library item and a template. This is what a final page from the template might look like:
Copyright © 2004 Dan Vaughan and its licensors. All rights reserved.