Optimizing Photos and Text Using Fireworks:
– Comparing Compression Schemes
– Using the Optimize Panel
IMPORTANT NOTE!
There are TWO parts to this exercise.
Be sure that you read ALL instructions on this page.
Do BOTH parts of this tutorial.
Note to Mac users: If you do not have a right mouse button, then use Ctrl-left click whenever asked to right click. Whenever the instructions call for the Ctrl key, use the Command key instead.
Introduction:
The intention of the two exercises on this page is to demonstrate to you the benefits of using one compression format over another: JPEG or GIF. Web pages use those two formats for almost all images, with the exception of Flash, which is usually used for animated images. The rule regarding whether to use GIF or JPEG is, generally speaking:
- For photographs, JPEG will produce a superior image with a smaller file size.
- Images consisting primarily of areas of solid color (such as most logos, comics, images of text) are usually best as GIF files.
The objective of this tutorial is to determine the file format (JPEG or GIF) and the settings for that format that will provide you with an image that looks acceptable and also has the smallest possible file size (in KB). Large image file sizes are the primary cause of slow web page downloads so it is important to minimize download times by keeping the file size small.
By file size I am referring the amount of KB that the file uses. Ideally, with either of the images you will use in this tutorial the sizes ought to be well under 75KB. The first image that you will use can look good in either format, but you need to find out which would be better in your opinion in terms of image file size and image quality. You need to strike a balance for either format between image quality and file size.
The process of making image file sizes small while maintaining image quality is called Optimization. Both JPEG and GIF compress files to make them smaller. In both cases some image information is lost. With JPEG information is lost based on its complex algorithm. With GIF files, colors are limited by a maximum of 256 colors.
Incidentally, JPEG stands for Joint Photographers Experts Group and uses the extensions .jpg or .jpeg. GIF stands for Graphics Interchange Format and was introduced by CompuServe (remember them?).
Please look at this Comparisons of Optimization Settings
Screen resolution:
- Note that Fireworks is designed to be used with monitors set to a resolution of at least 1024x768 otherwise some features of the interface may not be visible.
- 1024x768 is the minimum resolution for Fireworks, the recommended resolution is 1280x800.
- The resolution can be set using the Windows Start button -> Settings -> Control Panels -> Displays -> Settings tab in the Screen Resolution section.
Photograph Optimization:
- Download Fireworks and the rest of the Creative Cloud if you have not already done so for a different exercise.
- Important: You must finish this and the other Adobe exercises before the 30 day trial version expires.
- NOTE: This tutorial ought to work properly with versions CS4, CS5, CS6.
- If you have any problems using this with Fireworks Creative Cloud please let me know (students, you ought to have my email address).
- Open Fireworks.
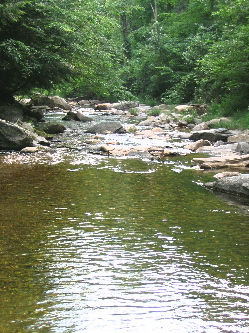
- Right click on the image of the stream and select Copy.
- In Fireworks go to (using the menus) File -> New
- A dialog box will open with a suggested size. This should be the exact size of the image you just copied! (249 pixels wide by 333 pixels high).
- Click OK
- A new file will open.
- In the Fireworks menu select Edit -> Paste (or use the keyboard: Ctrl-V)
- In the Fireworks Tools panel, be sure the Pointer tool (black arrow) is selected.
- In the selection bar immediately above the image, select
the button 4-Up.
- You will see four views of the same image.
- They are all the same at this time.
- Fireworks allows you to change each of them independently so that you can compare optimization (compression) settings in order to select the best one.
- First, click on the image in the upper right corner.
- It should now have a black border around its quadrant, indicating that it is currently selected.
- Note that an initial estimated compressed file size is displayed (ending with the letter K for Kilobytes) directly under the image along with the amount of time it would take for the file to download with a 56kbps modem which are still used (broadband penetration percentages by country - 2008 only 57% per this report)..
- Open the Optimize panel using the menu: Window -> Optimize
- Note that the Optimize panel may be in a panel group with the History and Align panels.
- In the Optimize panel, in the pull down menu at the very top of it, select JPEG - Better Quality if it is not already selected.
- The Quality number will be at 80.
- This number represents a compression algorithm that JPEG uses to reduce or increase the file size.
- The lower the number the less the file size, but also the less the image quality.
- Using the Quality number field's little drop down menu, try different settings (for example 40, 60, 80, etc.). Note that the setting you select will not affect the image until you release the slider. To do this, click away from the slider.
- The effect of the settings will be visible in the image quadrant you selected.
- As you increase or reduce the Quality setting note how the file size and image change. Reducing the quality level makes the file smaller but it also makes the image look worse.
- Your task is to make the download time as brief as possible and yet maintain an acceptable level of image quality.
- You are striving for an optimal balance of the smallest file size possible while maintaining acceptable image quality. This is called optimizing.
- Keep in mind that the criteria for what constitutes acceptable quality is a subjective decision. There is no correct answer.
- To get a closer view:
- Select the Zoom tool at the
bottom of the Tools
panel. Your pointer's icon should now look like a magnifying glass.
Use it to click on the spot you want to magnify. If you want to reduce the magnification, hold down the Alt key then click. If you don't see the Zoom tool, it is possible
that it is hidden behind your Windows Task Bar if you are working at a resolution of less than 1024x768.
If so, try this:
- To temporarily get the Zoom tool, use the hand that you don't use for your mouse to hold down the Ctrl+Spacebar keys on your keyboard. Keep those keys down with one hand. You ought to see a magnifying glass icon with a plus sign in it. Continue to hold those two keys down.
- Move your cursor over the image with your other hand. Then click with your mouse to get magnification of the spot you click on. When you release the keys, the cursor should return to the Pointer tool.
- To reduce magnification, do the same thing, but also press and hold down the Alt key (Ctrl-Alt-Spacebar). On the Mac, use Command-Option-Spacebar.
- There is also a percentage magnification menu in the lower right corner of the file's window that you can use.
- If you have been able to select the Zoom tool in the Tools panel, click on the location of the image you want to enlarge. Then to reduce the magnification hold down the Alt key (Windows) or Option key (Mac). To return to normal magnification, double click the Zoom tool icon in the Tools panel (if you can see it) or click Ctrl-1 (that's Ctrl and the number "one") on the keyboard.
- Select the Zoom tool at the
bottom of the Tools
panel. Your pointer's icon should now look like a magnifying glass.
Use it to click on the spot you want to magnify. If you want to reduce the magnification, hold down the Alt key then click. If you don't see the Zoom tool, it is possible
that it is hidden behind your Windows Task Bar if you are working at a resolution of less than 1024x768.
If so, try this:
- Return to using the Pointer tool by pressing V on your keyboard or selecting it in the Tools panel.
- The cursor ought to be black.
- If your cursor is a white arrow, press V again and it ought to become a black arrow.
- You can see other hot keys by hovering over them in the Tools panel.
- If there is a small black
triangle under a tool, it means that there are
related tools underneath it that you can
select by either:
- click-holding on the tool with your mouse, or...
- repeatedly pressing its hot key
- Now select the quadrant in the lower right area. After selecting it, the quadrant should be surrounded by a black border indicating that it is selected.
- Return to the Optimize panel.
- In the Optimize panel, in the pull down menu at the
top, select GIF WebSnap 256.
- Check the image quality and file size underneath the image. If you can't see the file size and download time, maximize your file's window. I hope that you know how to do that because it's basic Windows knowledge. Also, hide your Properties panel by deselecting it in the Window menu or by pressing Ctrl + F3 on your keyboard.
- Does the image look good?
- Reduce the file size of the GIF by reducing the Colors used. Do this using the Colors menu in the Optimize panel.
- This is how file sizes are reduced for GIF files.
- The fewer the colors, the smaller the file, however the image quality will deteriorate.
- You can manually type in an amount, however GIFs cannot hold more than 256 colors.
- Try increasing the Dither percentage.
- Dithering uses dots of the available colors to attempt to mimic other colors that were in the original image but are not available now due to the limit on colors.
- Seen from a distance, the dots tend to blend into each other and provide a different color. This is how newspaper and magazine images are printed, as tiny dots. You can use a magnifying glass and look at one of them to see what I am referring to.
- After making your preferred JPEG settings in the upper right quadrant and GIF settings in the lower right quadrant.
- Which do you prefer, gif or jpeg?
- As previously stated, t is a subjective decision.
- However, generally photos are better off as jpeg. But with this particular photograph you may find both the JPEG and the GIF settings are acceptable, both for image quality and file size.
- Leave the selections in the Optimize panel at the what you consider to be the optimal settings.
- Go to the File menu and save the file using the Fireworks
default png (pronounced "ping") file type. Save it with the file name:
OptimizePhotoYourlastname.png - Next, go to the File menu and select Export.
- This is used to create a new file that is essentially a copy of the png file, however it will use the optimization settings that you have made and be much smaller than the png file.
- Fireworks will offer to save the file using the same name as the png file, but using the appropriate file extension, gif or jpg.
- Click Export.
- Attach the exported file that you prefer (be it gif or jpg) to an email and send it to me.
- Include in the message the optimization settings that you used, for example, JPEG quality 80 or GIF 128 colors.
- At the start
of the Subject line have this:
FWP - Optimized Photo - Your last name - Course Number*- * The course number that I provide for the course
Solid Colors Optimization:
- In Fireworks, go to: File > New to create a new file.
- In the New Document dialog box:
- Specify a Canvas Size of 200 by 200 pixels. (Note: Canvas is the name Fireworks uses for the background.)
- Set the Resolution to 72 dpi (this is what you should always use for Web images).
- Select Canvas color -> Custom
- Then click on the color selector box underneath the word Custom.
- The palette of Web safe colors will appear.
- Select a Canvas color, but keep the color light.
- In the Tools panel, select the Text tool (it uses the icon of the letter T) then click anywhere on the canvas.
- Type your first name.
- Use the Pointer tool (the black arrow tool).
- To reposition the text, use the Pointer tool to click and drag it into position.
- Then select the letters of your name by click-dragging over them or double clicking on them.
- With the letters selected, use the Properties
panel to do
the following:
- Reduce or increase the size of the letters by changing the font size to the left of the color selector.
- Select a font that you like.
- Make the text bold using the B button.
- Make the text a dark color but not black.
- Try to fill up the width of the background (canvas) with your name.
- In the Properties panel
there is a setting: No
Anti-Alias. Use
that menu to determine which anti-aliasing setting
is best. There are three options. They create
slight blends with the background color to make
the text look smoother. Note that some anti-aliasing
is usually needed for text larger than sizes 12 or 14. Text must be judged at 100% magnification. Be sure that you are at that magnification by holding down Ctrl and then pressing the 1 key on your keyboard. See the examples below.
 Anti-Aliasing
Menu
Anti-Aliasing
Menu
 No
Anti-Alias
No
Anti-Alias
 Smooth
Anti-Alias
Smooth
Anti-Alias
- If you want to reedit the text, just double click on it. Then be sure to select the text before you try to modify it.
- Select the Pointer tool if it is not selected.
- Next, at the top of the file's window, select the 4-Up button once more.
- You will see the four quadrants again.
- Note: if you can't see the text any more, hold down the space bar on your keyboard which will temporarily change your cursor into the Hand tool. This tool may only work in the upper left quadrant but it can be used there to reposition all of the quadrants' images at the same time if you click and drag on the image. The Hand tool does the same thing as using scrollbars. Click-drag on the canvas until you bring the text into view.
- Let go of the spacebar and you ought have the Pointer tool again.
- Now experiment with different optimization settings in the same way
you did previously.
- Try both GIF and JPEG in each of the two right side quadrants using the top menu in the Optimize panel.
- Get the file size as small as possible and yet still maintain acceptable image quality.
- Check the image quality and file size as you experiment.
- Again, it is important to note that text should never be judged in Fireworks at anything other than 100% magnification. Remember to press Ctrl + 1 (that's Ctrl plus the number 1) to set your magnification to 100%.
- Which do you prefer, gif or jpeg? It is again a subjective judgment. Generally, images of this type are better off as gif files.
- Save your file using the name:
OptimizeTextYourlastname.png - Next, go to the File menu and select Export.
- This is used to create a new file that is essentially a copy of the png file, however it will use the optimization settings that you have made.
- Fireworks will offer to save the file using the same name as the png file, but using the appropriate file extension, gif or jpg.
- Click Export.
- Attach the exported file (be it gif or jpg) to an email and send it to me.
- Include in the message the optimization settings that you used, for example, JPEG quality 80 or GIF 128 colors.
- At the start
of the Subject line have this:
FWT - Optimized Text - Your last name - Course Number*- * The course number that I provide for the course
- Remember, again, there is no right or wrong answer.
Congratulations, you have completed the assignment and now know how to optimize images to achieve a balance of optimal download time and image quality!
© 2008 Dan Hitchcock Vaughan and its licensors. All rights reserved.