Introduction to Fireworks: Take A Test Drive
In this exercise we will try out Macromedia's program Fireworks. This program is intended to be used primarily for creating new images and optimizing existing images for use on web pages. It is similar to the program Adobe Photoshop, however it does not contain the print capabilities of Photoshop.
If you haven't downloaded it already (as per the lesson), then download the free 30 day trial version of Fireworks. Again, do NOT download Dreamweaver or Flash yet!
After you have successfully downloaded and installed Fireworks, start it up if it isn't running already.
Let's first create a practice example of what will look like a Web page button using Live Filters which is the term Fireworks uses for its ability to make easily modifiable customized shapes. With Live Filters you can apply varying textures, fills (the area inside the edges of a shape), borders, and image effects such as blurs, drop shadows, etc., and change them in the future with ease.
Try it:
- Start up Fireworks.
- File -> New
- Create a 300 by 300 pixel Canvas Size (Canvas is their artsy word for background).
- Set it to a resolution of 72 pixels/inch (72 is the standard image resolution used for Web and it is what you should almost always).
- Set Canvas color to white.
- Click OK.
- Find the Tools panel. It's probably on
the left side. If not, use the Window menu to select
and open it. It's a vertical toolbar with drawing and painting tools.

- Click on the Rectangle tool. You will find it in the Vector section of the Tools panel (see the illustration at right). Its icon looks like a clear square. If you don't see it, press on the letter U on your keyboard until it appears.
- Your cursor will become a Plus (+) sign.
- Click and hold down your left mouse button near the upper left corner, inside of the white "canvas" area.
- While continuing to hold down the mouse button, drag
down to your right to make a rectangle about two inches
wide (the size is not that important, just make it
smaller than the canvas).
- If you make a mistake, use the Pointer tool (the black arrow tool) to click on the shape you made.
- This will select it. You will be able to tell that it's selected by the small blue squares on the shape's corners.
- Then press the Delete key on your keyboard to get rid of the shape. Then start again.
- Click on the Pointer tool
(the black arrow tool) and then click on the rectangle
you just created in order to "select"
it. It should have small light blue squares in each
corner to indicate that it's selected.
- Continue to use the Pointer tool (black arrow) tool for the duration of this exercise.
- Periodically make sure you're still using it (your cursor should be a black arrow), because several of the letters on the keyboard are "hot keys" for selecting other tools and you might inadvertently press one of them. If you don't have a black arrow for your cursor, then press "V" on your keyboard until you see it.
- Also, for the duration of the exercise, the rectangle shape that you made will need to remain "selected", so make sure that you see the little light blue squares on its corners. If you don't, click on the rectangle with the Pointer tool (black arrow) until you see them. As is the case with most programs, you can't apply any formatting modifications without first selecting the thing you want to modify.
- If your rectangle is a light blue thus making it
hard to see the light blue squares, or if it's very
dark, then change the rectangle's color. You may
want to try this anyway in order to learn how to
change a "fill"
color.
- Near the bottom of the toolbar, left mouse button click and release on the little down-pointing triangle attached to the square to the right of a small bucket icon (see illustration: "Fill Color").
- A color palette (color selector) should appear.
- Select a color that is not too close to light blue so that you can determine when the rectangle is selected.
- Don't select a color that is too dark or too light or else the image characteristics we're about to apply will be harder to see.
- Now look at the Properties panel. You should see it at the bottom of your screen. It is a horizontal panel. If you don't see it, use the menu to select it: Window -> Properties.
- On the right side of it, click on the Plus (+) sign next to the word Filters. A menu will appear. Select Bevel and Emboss, an then Inner Bevel. Your rectangle should now look like a raised button.
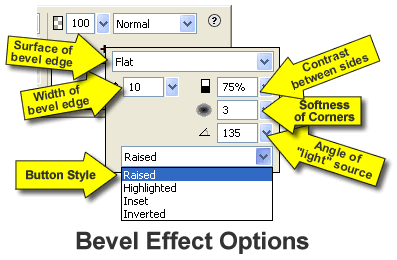
- You should also see a dialog box similar to what is illustrated below. It allows you to vary the appearance of the beveled edge. If the dialog box does not appear, then look on the Properties panel underneath the word Filters. You should see the words Inner Bevel. Double click on those words and the dialog box will appear again.

- Try the options in the lower pull down menu: Raised, Highlighted, Inset, and Inverted. This is how you make shapes look appropriate for the different states of a button.
- Try various other effects:
- Make sure the rectangle continues to be selected before you do.
- Then click on the plus (+) sign on the Properties panel next to the word Filters.
- Select and try various effects from the menu.
- Once applied, you can turn them on or off individually in the area under the word Filters by clicking on the check mark next to the name of the applied effect.
- If you have any problems, start again.(I bet you love reading that!)
- Also, try various fills (the color inside the shape) and strokes (the edge of the shape).
- Use the drop down menu in the Properties panel to the right of the Bucket color selector and also in the drop down menu to the right of the Pencil icon.
- The bucket is for selecting the fill and the pencil the stroke.
- In the fill color menu select Pattern.
- You'll be amazed at the options presented to you.
- Have fun! (That's a requirement of this exercise!)
- Investigate the Info panel
(Window
-> Info). It shows you the location of
the cursor and the color under it (whenever
your pointer is over the "canvas" area).
- The location of the cursor is given in pixels
relative to the upper left corner.
- Most Web page locations are specified relative to the upper left corner of the image or the browser window.
- X = horizontal and Y = vertical.
- If you are familiar with Cartesian coordinates, you will note that the Y values go up as you go down, the opposite of what you would expect.
- The location of the cursor is given in pixels
relative to the upper left corner.
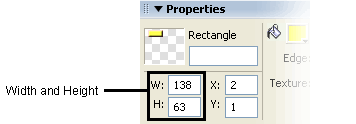
 In the Properties panel note that
the dimensions of the selected rectangle are shown as
W and H (width and height).
 - Try changing the size of the rectangle by changing the numbers for it's dimensions in the Properties panel.
- Save the file using the file name: FWstartYourlastname.png. Fireworks' default file format is the lossless file format PNG (which stands for Portable Network Graphics). Fireworks uses it to save files because it allows for easy future alterations. Web pages almost always use the image file formats gif and jpeg. Those formats are no longer easy to modify. It's best to keep your original file in the png format so that you can easily make changes in the future. We will learn later how to export files as gif or jpeg files using Fireworks.
Send me the file attached to an email with this at the start of the subject line:
FWI - Fireworks Intro
© 2007 Dan Hitchcock Vaughan and its licensors. All rights reserved.