Flash Motion Tween Basics
Flash is Adobe's software for creating simple animations
which are primarily used on Web pages.
By far the
most important thing to know in Flash is how to create a motion
tween.
Once you know how to create one, you may notice
how almost every Flash animation on the Web consists of combinations
of one or more motion tweens.
Usually each animation will
have a few of them, overlapping or on top of each other.
For example: text zooming up then fading away on top of
a static image moving from left to right.
Use motion tweens as much as possible. Also,
avoid using bitmap images (photos) as part of your Flash
animations. These two suggestions are made to help you
to minimize file size, which is one of your most important
objectives when building a web page.
Tweens
Flash has two types of tweens: motion tweens and shape tweens.
Motion tweens provide the smallest file sizes but are less
flexible than shape tweens. Shape tweens can do all the
same things as motion tweens but they can also "morph",
meaning change shapes drastically. Motion tweens are limited
in how much they can change the shape of an object. However,
you want to use motion tweens as much as possible because they
provide the smallest file sizes.
What is a motion tween? The root of the word "tween" comes
from the old animation industry, in the days before computers
when animation was drawn exclusively by hand. Every individual
second of animation required as many as 24 separate drawings.
There were two main types of animation artists who made these
drawings. The better artists were the ones who drew the keyframes,
which were the primary positions of the characters. For example,
the beginning and end positions of a pitcher throwing a ball.
The "tweening" artists would then make all the drawings
for the frames between the keyframes. That was called tweening.
Persistence of Vision
These hand colored drawings would then
be shot as single images, then put together on reels of film
so that when the film was projected at 24 images per second
(the actual term used is frames
per second or fps),
viewers' brains would tie the images together to create
the illusion of smooth motion. This illusion of contiguous
motion is called the Persistence
of Vision.
Note that, by
default, Flash files are set to be run at 12 fps which
is not quite fast enough for our brains to stitch the
images together. 16 fps is often considered the minimum
but due to bandwidth and other problems, Flash is often
unable to represent faster speeds.
There were two main types of animation artists who made these
drawings. The better artists were the ones who drew the keyframes,
which were the primary positions of the characters. For example,
the beginning and end positions of a pitcher throwing a ball.
The "tweening" artists
would then make all the drawings for the frames between the
keyframes. That was called tweening.
Flash Symbols
Flash uses a similar paradigm, except that when using Flash
motion tweening, the keyframes usually represent changes
of direction, size, and similar attributes of an object rather
than exclusively referring to dramatic changes in an object's
shape.
For an object be animated using motion tweens, it must first
be converted into a symbol. Symbols are stored in a
Flash Library.
Every file has its own Library, but Libraries can also be shared.
Using symbols
helps to keep file sizes small.
When a motion tween is created, a visually identical representation
of the symbol is used. This representation of the symbol is
called an instance of
the symbol.
It is not the symbol itself, but it looks identical to it.
The symbol is in the Library, the instances of it are used
in the animation.
If the symbol itself is modified, then all
instances of it will reflect that change immediately. This
can be very useful for providing control over the appearance
of many instances of the same symbol.
Keyframes
An instance needs to be in each keyframe of
the movement of the object. A keyframe needs to be created
whenever that instance changes direction or some other
characteristic (such as its color, size). This is similar
to old time animation keyframes, but motion tweens do not allow
for gross changes in a shape's outline or appearance.
What steps need to be taken to create a motion tween?
Here are the basic steps involved
in creating a motion tween. If you want to become better
at Flash animation it is imperative that you become adept at
making motion tweens! Following is a summary of a typical motion
tween procedure.
Do NOT do these now, just read them:
- Create the original object.
- Select it.
- Convert it to a symbol.
- Put one "instance" of the symbol in an empty
keyframe in a layer
- That position and frame will be the starting point of
the motion of the object.
- Layers will be explained later, but
if you are familiar with graphics programs such as
Fireworks and Photoshop, you are probably acquainted
with them already.
- Create another keyframe further ahead in time,
at the frame number where you want the animation to end.
- This second keyframe needs to be on the same layer.
- Note that you cannot have more than one motion tween per
layer.
- Put a second "instance" of the same
symbol in that other keyframe.
- In
the second keyframe, position the instance at the location
where you want it to end up, change direction, etc.
- Note that when you create a new keyframe, the pervious
instance on that layer, if there is one, will be copied
automatically to that new keyframe.
- It is important to know that the two instances are NOT
the same thing. They are derived from the same symbol,
but they can be positioned and manipulated independently.
- Right click anywhere in the layer between the keyframes
and select Create
Motion Tween.
- Press the Enter key on your keyboard to preview the animation.
Basic rules of motion tweens:
- You must use instances of
the same symbol to make each motion
tween.
- Only instances of one symbol will work properly per
layer.
Create your first motion tween
Here are the steps for making
a simple motion tween of a circle going left to right and
back again:
First, have a look at what you will be creating. It seems ridiculously simple, but the basic, rudimentary motion tween is the root of almost all that is produced from Flash: Basic Motion Tween Result
Please
be sure to carefully follow the instructions step by step.
You may want to print them out to make it easier for you
to do the work while you read the instructions.
- Download:
Flash
CS3 Professional (30 day free trial).
- If given the option, select Try instead of Buy.
- Do NOT download
any other programs at this
time.
- Only download Flash.
- Start up Flash.
- In the File menu select New...
- In the New Document dialog box, select Flash
File (ActionScript 3.0) then click on OK.
- Use the menus as follows: View -> Magnification -> Show
Frame
- This will allow you to see the entire area that will
be used for the animation, represented by the white
rectangle that is prominently in the middle of your monitor.
- The gray area outside of the white area will
not be seen in the final animation.
- Flash refers to the white area as the Stage.

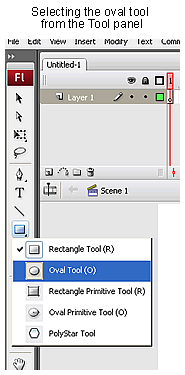
- In the Tools panel,
which should be running vertically along the left side,
select the Oval tool (see illustration).
- It will be the position in the Tools panel beneath the line tool (shown as a diagonal line) and above the pencil tool.
- However, you may not see the Oval tool at first. You may see another geometric shape such as a rectangle. If so, click and hold on whatever geometric shape you see in that position, and a menu such as the one in the illustration will appear. Then select the Oval tool from that menu.
- If you don't think you see the Tools panel, try
selecting Windows -> Tools
- Hold down the Shift key. In the empty white area,
click and hold down the mouse button, then drag, to form
a medium size circle that is about 1/4 the width of the white
area. Don't worry about where you put it, we'll move it later.
- Holding
down the Shift key
makes it a perfect circle.
- Immediately after making the circle, select the Selection tool
which is the black arrow at the top of the Tools panel,
but don't do anything with it yet. I want you
to select it now so that you don't inadvertently make
more little circles.
- Next, press and release Ctrl-A (Select
All) on your keyboard. to be sure you have the
entire shape selected.
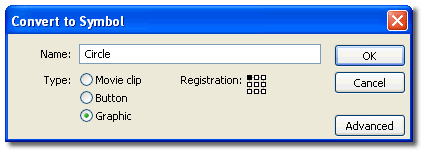
- Then use the menus: Modify -> Convert to Symbol.
- In the Convert to Symbol dialog box:
- For the Type select Graphic.
- For the Name enter Circle.
- Click OK.

- You have now created a symbol, which is stored in the
Library. You can see it there:
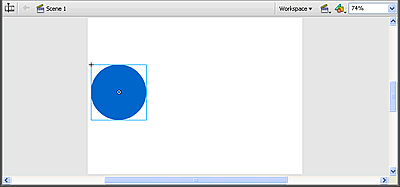
- What you see on the Stage is an instance of the Circle
symbol.
- Using the Selection tool (the black arrow), position
the blue circle near the left edge of the white background
area, and position it in the middle vertically. No part of
it should be in the gray area because anything not in the
white area will not be seen in the final file.

- Next, we will use the Timeline panel, which should
be at the top.
- If you don't see it, use Window
-> Timeline.
- It
represents frames (as in movie frames).
- By default Flash shows 12 frames per second.
- The Timeline has gray outlines for frame positions,
and then every fifth frame is a solid light gray (to make
it easier visually to select frames).
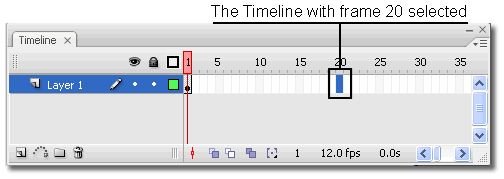
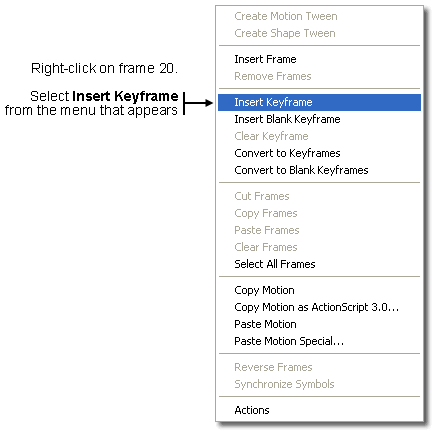
- Click in the gray frame under the "20" on
the Timeline to select frame 20 on Layer 1. The frame
will turn blue to indicate that it is selected.

- Then, RIGHT click on that frame and select Insert
Keyframe from the menu that appears:

- Adding the keyframe did several things:
- It established a length of time for the animation to
take place within. In this case, 20 frames, or
1.66 seconds.
- It copied the instance of the circle in the first keyframe,
which is frame 1.
- It put a copy of that instance in
frame 20.
- Now there are two instances of the Circle
symbol in the layer, one in frame 1 and the other in
frame 20.
You can only motion tween between two instances
of the same symbol on a layer.
- The copied instance in frame 20 will be in exactly
the same location as the instance in frame 1.
- Therefore it may seem to be the same thing that
is in frame 1, but it is not.
- Frame 20 is a different
instance than the one in frame 1, but they are
both instances of the same symbol.
- Confused? It's not an easy concept to grasp at
first, but over time you will probably be able to
understand it better the more you use motion tweens.
Understanding this concept is essential to making
progress with Flash.
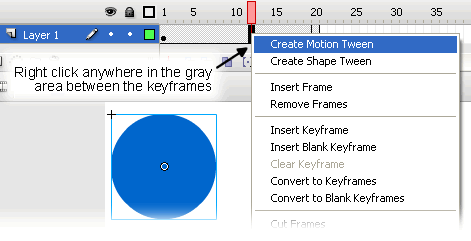
- Now, right click anywhere on the layer between the
keyframes. From the menu that appears, select Create Motion
Tween.

- The color between the keyframes should now be a pale violet
and there should be an arrow pointing from left to right.
That is how a motion tween is represented on the timeline.
(Shape tweens are pale green. )
- Move the pink playhead to frame 10 by clicking and dragging
on it.
- The playhead is the little pink rectangle
in the top part of the Timeline:

- Make sure that you have the black arrow tool (the Pointer
tool) selected.
- Click and drag the blue circle to the right side of the
white background area. This will create a keyframe
at frame 10. We have now established start and end positions
in time that look the same and a middle position that is
on the opposite side.
- Press the Enter key on your keyboard and you ought
to see the animation.
- Press Enter again to repeat.
- Ctrl + Enter will play the animation in a Flash player.
- The animation in the Flash Player will be "loop" (repeat
indefinitely). This is the default condition of Flash animations:
they don't stop unless set to do so.
Congratulations, you have now made a motion tween, the most
important thing to now how to do in Flash (IMHO). Perhaps you
can now see that units of animation such as this can be used
to create more complex overall animations.
Please send me your Flash .fla file or the
.swf file (which I'd prefer if you can find it, but don't worry
about it if you cannot). Please name it
basicTween_yourlastname
© 2007 Dan Hitchcock Vaughan and its
licensors. All rights reserved.
