Show-Hide AP Divs With Scrolling For Overflow
In this tutorial you will learn how to use Dreamweaver's AP Div tags in conjunction with JavaScript behaviors to display different content within a section of a page. The purpose of the exercise is to have you work with Behaviors in Dreamweaver, form buttons, AP Div's, and more.
AP div tags allow you to specify positions on a page with great accuracy. The AP stands for Absolute Positioning. They allow you to place content inside the AP Div container and position it wherever you want on the page.
AP Div's with scrollbars are similar to what can be done with html framesets. Framesets allow you to scroll one area of a web page independently of the other areas. However, the method you will use herein has some distinct advantages over using framesets, such as search engines will find all page content in a single html file instead of two or more html files.
First, we will put buttons inside of an AP Div:
- Create a new html file.
- Save it, naming it buttonsYourlastname.html - changing yourlastname to your actual last name, of course.
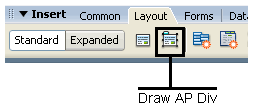
- In the Insert Panel select the Layout tab.
- Click on the Draw AP Div button:
- Hover over the new page with your mouse. You ought to see a plus sign for the cursor. Bring it to the upper left section of the page.
- Click and drag to make a single rectangle about the size of the reddish area that contains the four buttons on the left top of this page (the buttons are the small rectangles that have the names of the colors on them).
- There is no need to be overly precise.
- An AP Div is basically a container that can have almost anything placed inside of it (an image, text, table, etc.) and then the AP Div can be moved, with its contents, to any location on the page.
- BTW, one can position AP Div rectangles by clicking and dragging on any of its edges. If you want to move one, first hover over the edge of the rectangle, look for a plus sign with arrows on the tips of its lines, then click and drag it anywhere.
- Open the AP Elements panel: Window -> AP Elements.
- Double click on the AP Div's name in the AP Elements panel. It will probably have the name apDiv1. Change its name to Buttons.
- Click inside the AP Div's outline.
- You ought to see a long flashing vertical line on the left edge of the rectangle that runs the height of the AP Div's rectangular shape, indicating that the insertion point is inside the AP Div.
- Next, you will be putting a table in the AP Div. It will have 4 rows and 1 column as follows. This is how you do it:
From the menu bar: Insert -> Table. The Table dialog box ought to open. - Use the settings shown in the illustration below:

- Note that a table is a group of rows and columns similar to an Excel spreadsheet only with a lot less columns and rows.
- Similarly to Excel, a table has cells.
- You can put anything you want inside of a cell (an image, text, even another table), just like you can put anything you want inside of an AP Div.
- The reason that we are putting the table inside of the AP Div is so that we can have a neat, orderly arrangement of buttons later on; all of the buttons being in a neat, single column. We can stack the buttons in this manner by putting one button in each of the table's cells.
- Note that in this tutorial a button will look like one of those Submit objects that you sometimes need to click on at the bottom of a Web page form. The following is just an example, it won't do anything if you click on it:
- After putting all the buttons in it will be easy to position the table because we can move the AP Div that contains the table anywhere we want.
- You cannot position a table alone with that degree of flexibility and ease. A table inside an AP Div can be positioned anywhere on the page with great precision.
- Click OK to close the Table dialog box.
- Your table ought to now be inside of the AP Div although it may be difficult to tell that it is.
- You will see what appears to be four or five compartments stacked on top of one another, resembling something like what you see below which is a four row, one column table (with a 1 pixel border - your border will not appear as thick):
- Each of the compartments is called a table cell. And because the table has only one cell per row, each cell also represents an entire row in the table, hence our specification for four rows.
- You may see that appears to be a fifth bottom compartment if it appears at all. That is actually the space between the bottom of the table and the bottom of the AP Div container.
- There is only one column in the table; the table has four rows in it with just one cell per row.
- Because the sides of the table coincide with the sides of the AP Div that contains the table it is difficult to tell that the table sides are there.
- Click inside the top cell.
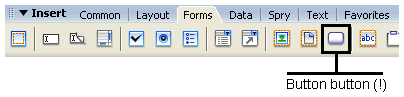
- Using the Insert Panel's
Forms tab,
click on the Button button.
- The Input Tag Accessibility Attributes dialog box will open. Normally you would fill this out, but for our purposes, just click Cancel.
- You will be asked: Add form tag? Click on No.
- A button with the word Submit on it will appear in the cell. Click on the button to select it.
- In the Properties panel do the following:
- Set the Action to None. As soon as you do this the word Submit will change to the word Button.
- In the Value field, enter the word Yellow. This will change the name of the button to yellow. Hit Enter to see the change of name.
- Repeat the same process (steps 14-18) with the three remaining cells to end up with a total of four buttons each with different color names, one in each cell.
- Once more, click on the Draw AP Div button in the Layout tab of the Insert panel.
- Draw another AP Div, a little bit wider than the area at the top of this page that has the scrollbars on its sides and the Latin text in it. You can position it wherever you like, just not on top of the AP Div that you created the has the buttons in it.
- Fill the new AP Div with three or four sentences of text. You can use the famous Lorem Ipsum Latin text you find at this site: http://lorem-ipsum.perbang.dk/ This is text that has been traditionally used for demonstration purposes. Copy and paste a paragraph of it into the AP Div you just made.
- Add a bit more text content than the AP Div will appear to hold - the AP Div will appear to expand to accommodate the content.
- A dashed line may appear that represents the height of the AP Div. Be default an AP Div will expand to accommodate content, the dashed line that appears marks the original height of the AP Div.
- Note that later on you will be adding color to the AP Div's background at which time the color will appear to end at the dashed line, however, when viewed in the browser using F12 the color will completely fill the AP Div.
- Click on any edge of the AP Div with the Latin text in it to select it.
- You can tell that the AP Div is selected if you see a little tab in the upper left corner of it and there are small squares on the corners and sides.
- In the Properties panel:
- Select a color from the Bg color selector that corresponds to the color you named your top button.
- Name the AP Div that you currently have selected by typing the name into in the upper left section of the Properties panel, under the label that says CSS-P Element. Name it the same name as the color name used for its background.
- Now name the AP Div that has the buttons in it Buttons.
- Also in the Properties panel, set Overflow to scroll. The AP Div's height will get shorter if it has a lot of text in it, going back to its original size.
- You will not see a scrolling effect in Dreamweaver.
- Use F12 to preview your web page in your browser and you should see the scroll bars there and they ought to work.
- Note that Internet Explorer may ask you if you want to allow blocked content. This will happen when previewing the page locally (that is, opening a file that is on your computer). To prevent this annoying message in the future, in Dreamweaver, go to the Commands menu and select Insert Mark of the Web.
- Save your file.
- Select the AP Div you just made and copy it using the standard Edit -> Copy command.
- Deselect the AP Div after copying it.
- Edit -> Paste. The copied AP Div will appear on top of the original.
- Give it a different Bg color that corresponds to the second button name.
- Do the preceding three steps until you have the 4 AP Divs (excluding the Buttons AP Div) each with a different color corresponding to a button's color name.
- If you have done the preceding steps properly, the AP Divs with the text and color backgrounds should be directly one on top of the other and you will not be able to see more than one of the AP Divs at a time.
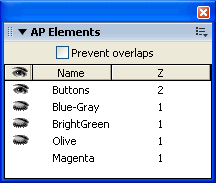
- You should end up with 5 AP Elements listed in the AP Elements panel similar to what you see in the illustration below.
- In the AP Elements panel, set all of the color AP Divs (except
one that you want visible initially - in the case of this page it is the yellow one) to the closed
eye setting.
Leave the initially visible colored AP Div set to default, which
means NO eye (in the illustration below it is Magenta - sorry about the confusion, the illustration ought to show a Yellow AP Div example listed instead). The buttons panel ought to have the open eye visible:
- Select the color button that corresponds to the color that is set to the default (no eye).
- Open the Behaviors panel: Window -> Behaviors (not Server Behaviors).
- In the Behaviors panel, click on the plus ( + ) sign button at the top of it and select Show-Hide Elements.
- The Show-Hide Elements dialog box opens.
- From the list, select the AP Div that corresponds to the color of the button you selected.
- Set that AP Div to Show and all the other color AP Divs to Hide.
- Do this with all of the buttons.
- In the Behaviors panel, set the Events for all of them to be onClick if they are not already set that way.
- Do this with each of the buttons.
- Test it.
- Send me your file naming is APDivYourlastname.html, of course replacing "Yourlastname" with that of your actual last name.
| cell, row 1 |
| cell, row 2 |
| cell, row 3 |
| cell, row 4 |
Good work!
© 2007 Dan Vaughan