Web Hosts and Basic Web Pages
Getting A Free Web Host at: 50webs.com
If you want to make your material available to the rest of the world on the web, you will need a location on the web where people (including your instructor!) can access your web pages. This is called a web host.
Following are instructions for creating a free Web hosting account that has no ads. You will use the site that you create in this exercise for other assignments so that you can upload assignment files to it.
Here are the steps you will take below:
- Create a free Web hosting account at 50Webs.com.
- Edit the home page that is already there.
- Copy some html code, modify it, and then save it as an html file (a web page).
- Then you will upload that file and look at it.
- Finally you will send me the web address (URL) of your new Web site.
- We will use this hosting site for other assignments as well.
Please follow the instructions carefully, step-by-step. Note that you may sometimes see the term Directory. The term directory means the same thing as "Folder".
Instructions for Opening a Free 50 Webs Hosting Account
and
Using Their Online Tools to Edit a Web Page
- Go to the 50 Webs Web
site: http://www.50webs.com/
- In the bottom left corner of the window that opens, you
will find a section for "Totally FREE - NO ADS", "FREE
$0.00/MONTH".
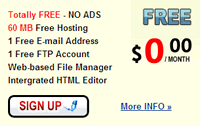
- Click on the SIGN UP button in the lower left-hand
corner of that section at the bottom of the page.
- On the next page, it will say: "Please, select
the hosting plan that best suits your needs".
- On the far right of the page, the following option should
already be selected: "FREE - Totally FREE - NO ADS".
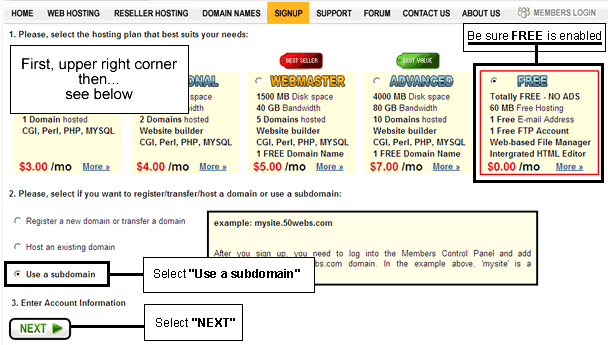
- Near the bottom of the page is #2: "Please, select if you want to register/transfer/host a domain or use a subdomain".
- Select: "Use a subdomain".
- Note:
- A subdomain can be thought of as a sub-section of a domain. The domain in this case is the 50webs part of 50webs.com
- A subdomain example would be the dan in dan.50webs.com
- You will be given a subdomain of 50webs.com based on the username that you provide.
- Item #3 will appear: "Enter
Account Information".
- Underneath it, click on NEXT. Be patient, it may
take some time for the next page to appear.
- In the next page, you will be asked to "Enter Account
Information".
- Please fill in the information.
- For the Username, determine a name that is
very unique because most common expressions or terms
have been used already. Write down your user name,
so that you don't forget it.
- You need to provide an email address that you can
easily access because the password you will need will
be sent to that email address.
- At the bottom, the following should already be selected: Use
50webs subdomain
- There should be no charges, the following should
have no dollar amount after it: "Total amount
to be charged:"
- For the Username, determine a name that is
very unique because most common expressions or terms
have been used already. Write down your user name,
so that you don't forget it.
- The last entry needed on the page is to type in the Security
Code into the text box beneath the code. Make sure
you copy the text and numbers exactly as shown on YOUR
page, NOT the numbers as shown below. Below is only an
EXAMPLE:

- Just before the Signup button, there is a checkbox
that says "I agree with your Terms and Conditions" including
a link to those Terms and Conditions.
- Before you agree to them I suggest you read those
terms and conditions including links within such
as one regarding privacy .
- I am not a lawyer and am not qualified to offer
you any legal advice.
- I personally have no problem agreeing to the terms,
based on what is written there.
- However, I am always careful not to upload
material that I do not have the rights to (images,
text, music, video, etc.) and I would never upload
anything lewd or malicious. I use common sense.
- This course expects you to abide by their Terms
and Conditions and does not indemnify you for any
violations of them by you.
- Now that I've totally alarmed you ;-) let us proceed.
- Before you agree to them I suggest you read those
terms and conditions including links within such
as one regarding privacy .
- Click on the Signup button. Be patient, it
may take some time.
- On the next page, it should say:
Your FREE WEB HOSTING account has been created successfully!
- Underneath it, you will be asked to check your email for
the information you will need to proceed.
- When you receive the email, do not follow the instructions
in the email unless I instruct you to
do so!
- As of this writing, the email's instructions are
not accurate and the videos do not represent the
appearance of the actual web site.
- As of this writing, the email's instructions are
not accurate and the videos do not represent the
appearance of the actual web site.
- Be sure to Print and save the email because it
contains useful information that you will need to maintain
the account.
- Your site should be available for making files within
10 minutes.
- Wait at least 10 minutes.
- Then, go to the members login area by clicking here:
http://www.50webs.com/members/
- Login on the right side where it says LOGIN FOR FREE
HOSTING USERS using your Username and the Password you
received in the email.
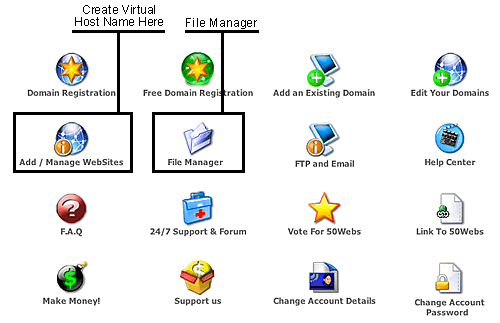
- A page will open with a lot of icons (image below). Here are some of my comments about the usability of that page:
- The page illustrated below (with the icons) should
have some type of name identifying what the page is about. The only possible identification I see
is HOME, 50Webs.com, and We.bs. However, they are not the page name, they are links, and they also appear in the same place on several of the other pages, thus not making a distinction between those pages.
- Also, you
can't too easily refer to this area as your home page
because it's not your Web site's home page (the page people on the outside go to when they first come to your site). Rather, this is the main page of the controls that they are providing you with to work on your site.
- To further complicate matters, a side navigation bar on one of the pages includes text links to most of the places that the icons on this page also lead to. (See illustration below that has a column of links headed by the words CONTROL PANEL.) So, if that navigation bar is the "Control Panel" shouldn't the page be called that as well?
- In the Assignments section at the bottom of this page you will be asked to make suggestions on how this usability problem might be resolved.
- The only icons we will be using
will be:
- File Manager - This is used for uploading files
from your computer to the host so that others can see them
on the Web.
- Note that the File Manager may not work
until you create a sub-domain as follows:
- Note that the File Manager may not work
until you create a sub-domain as follows:
- Add a Web Site - What this really means is to Create a Subdomain of the 50webs.com web site.
- An example of a sub-domain is "dan" in http://dan.50webs.com
- The illustration below is of the page you will see when
you click on HOME in the upper left corner of
most of the Web pages, including this one itself (again, you don't really know where you are because this area does not have any identification).
- An example of a sub-domain is "dan" in http://dan.50webs.com
- Click on the icon Add/Manage WebSites. This will bring
you to the Add a Web Site section.
- There is a section that asks you to "Create a new domain name structure, that will look like: yourname.50webs.com:"
- In the first text area type your user name (we are using it for the sake of simplicity).
- Whatever you choose would replace the word "yourname" in
the web address example above.
- Whatever you choose would replace the word "yourname" in
the web address example above.
- In the next box, use the drop down menu and select "50Webs.com". This, too, will be easier for you or others to remember, rather than using the WE.BS that they offer initially.

- Click on Create the Host.
- If the name you provided already exists, then you will
need to provide a different one and you will need to use
that other one going forward.
- You will note your web
address as the first thing in the yellow box. In the example below, my subdomain/username is named rollingthunderv2, my full web address is rollingthunderv2.50webs.com

- Wait 30 minutes and refresh (reload) the page (you can use this for most
browsers: Ctrl-R, for IE7 it's F5).
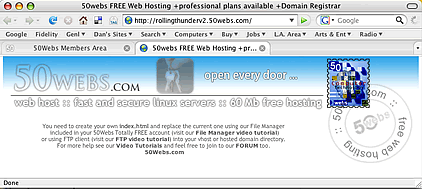
- Take a look at your Web site's home page by entering your
Web address in your browser. You will probably see something like this:
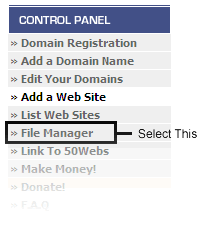
- Now, go back to your on the
left side in the Control
Panel select File
Manager:
- Now you will be in the File Manager. Click on the folder
with the name of your site on it. For example:

- You will now see the files and folders in your Web site.
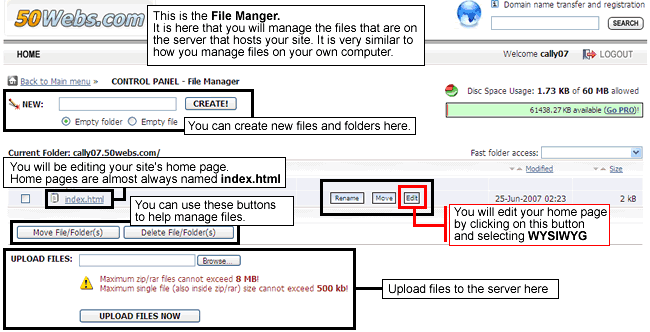
Currently the only thing there is the file index.html
- Take a few minutes to acquaint yourself with the features
of the page illustrated below, including:
- How to create new blank html files and empty folders.
- How to move or delete files and folders.
- How to upload files.
- How to edit a Web page already on the site (which is what you will be doing shortly).
- Note that a file named index.html is almost always
the file name of a home page because it is the page the server
will send when no specific file name is specified, which is the
case whenever you type in a Web address such as
http://www.ucla.edu
- When a file name is not provided a Web server
usually sends the file named index.html.
- With a Web address such as the one just shown for UCLA, if you were to provide the following Web address instead with one that includes the file name, it would open the same page (although a different Flash file may be shown): http://www.ucla.edu/index.html
You will now edit your home page
-
In the File Manager, in the same row as the listing
for the file index.html there will be an Edit button.

- Click on it and select WYSIWYG (pr. whizzy wig =
What You See Is What You Get). A WYSIWYG editor means that
it will show you what the page will look like and allow you
to edit it that way (visually) instead of requiring you to
type code!
- It will take a moment for your WYSIWYG editor to open and
during that interval you may see some html code. Do not panic!
The code will go away and be replaced by the more user-friendly
editor.
- When it opens, make note of the Microsoft Word style toolbars.
Inspect the different buttons. They allow you to do most
anything you can do in Word.
- You will probably see a designed illustration divided into
sections with lines, similar to the one previously illustrated (with the blue to white background and a stamp). The lines represent an html table,
which is one way to assemble sections of text, images, etc., into a nicely composed page.
- Right-click anywhere in the main page area except
on the images, text, or parts of the table.
- Select Select
All from the contextual menu that appears.
- Then press the Delete key on your keyboard or from the right-click contextual menu.
- Type the words This is my homepage.
- Then select the words by clicking and dragging over them.
- Using the Format drop down menu select Heading
Two.
- Then click on the Centering button (you know the one, it's
just the same as Microsoft Word's).

- Next, click on the button in the lower right corner in
the illustration above (the button with the magnifying glass).
This is used to open the Document Properties dialog box.
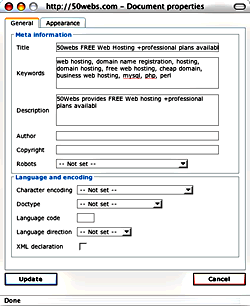
Fill it in as follows:
- Title: Your name's home page (substitute your actual name to replace "Your name")
- Keywords: charming, brilliant, ...of any other terms that properly describe you.
- Description: This is my home page, elegant, polished, and a little bizarre.
- Author: Your name
- Copyright: 2008 Your name
- Then click Update
- Note
that this will create the Web page's html title which will appear in
the "title bar" at the very top of the browser's window frame. It will also create what is called meta information,
which is general information about the web page that is hidden in the page's html code.
- You should now be back in the page editor. Deselect the words you wrote "This is my home page". Then press the Return key on your keyboard.You ought to be on a new row now.
- Then
click on the automatic item numbering button in the toolbar, its' the second button from the right in the second row, the one with the tiny numbers.
- Type in and list what you have learned from this exercise that you didn't know before.
- Make sure that everything you have entered looks OK.
- At the bottom of the page click on Save File.
- That will save the file and close the editor.
- Check your Web site:
- In your browser, type in your web
address which will be:
- username.50webs.html, replacing "username" with your username.
- username.50webs.html, replacing "username" with your username.
- For instance, the 50 Webs example site we have been using in
this tutorial would have this Web address: cally07.50webs.com.
- NOTE: that during my testing the contents of the page inexplicably did not appear, so I had to re-edit the page and re-type what we had entered.
- Your home page on the Web ought to look very similar to what you just edited at the 50Webs site.
Uploading files to your new Web host using the 50Webs File Manager
You can use the 50 Webs File Manager to upload files from your computer to your hosted site. This can also be done through other ftp "clients" such as those in NVU and Dreamweaver.
- If you are still logged in and are in the File Manager already,
skip ahead to the next section below, Creating a web
page using html code.
- If you have logged out of the 50 Webs site after the last
section was completed, please return to its home page and
click on MEMBERS
LOGIN on
the right side of the top menu bar.
- Then
login using your user name and password.
- Click on HOME near the upper left corner of the
page
- This will bring you to your 50 Webs home page.
- Select File Manager.
- Under the heading Current Folder you will see a list of
your virtual host(s) (also called sub-domains).
- There is probably just one there and it ought to have the same name as your username or the name you provided earlier if it needed to be different. Click on it, or the one you just created if there's more than one.
Creating a web page using html code
Below is some html code. Maybe you have never seen any, so there it is. HTML uses tags that are contained in angle brackets like these < > . There is usually an opening tag and a closing tag. The latter will include a slash: / . HTML is the code that all web pages are based on. I want you to have a tiny bit of experience using it. We will make a new file by copying the HTML code below. Copy everything between, but not including, Start and End below:
Click and drag over the text below and then right-click to copy it:
Start
<html>
<head>
<title>Your Title Here</title>
</head>
<body>
<h2 align="center">Your Name Here</h2>
</body>
</html>
End of copying
- Now that you have copied the code above, you will paste
it into a basic text editor:
- Windows users, open Notepad:
- Start menu -> All Programs - Accessories
-> Notepad
- Start menu -> All Programs - Accessories
-> Notepad
- Mac users: open TextEdit
- Windows users, open Notepad:
- Then paste what you copied into the empty new file.
- In the text that you copied and pasted into the text
editor, replace Your
Title Here with
a heading of your choice. The title will soon be appearing in the
title bar which is the top most edge of a window. This will happen after we
upload the file. Also, replace Your
Name Here with your first and last name. You have now
edited some html code!
- Following are specific instructions to create
folders and then save the file on your computer:
- In the File menu of Notepad (or TextEdit on the Mac) , select Save.
- Navigate to your C:\ drive (on Windows, or an appropriate place in your Mac Finder).
- If you haven't done so already in another exercise, create a new folder there and name it instDesign
- Make CERTAIN that you know where this folder is
so that you can return to it in the future.
- Within the instDesign folder, create another folder:
50Webs
- Now save the file, naming it exactly as shown here,
all lower case: page.html
- In the File menu of Notepad (or TextEdit on the Mac) , select Save.
- In the 50 Webs File Manager, click on the Browse... button
next to UPLOAD FILES.
- Find and select your new file.
- Upload the file by clicking on the button Upload Files Now.
- Check it online
by going to your new web address and adding /page.html at
the end of your Web address. For example:
http://mysite.50webs.com/page.html (you would replace mysite with your site's name).
On the Web, letter case (upper or lower) often does make a difference due to the widespread use of UNIX servers (not that you need to know that!). Also, it is important to note, that due to the prevalence of UNIX servers, you should NEVER have any spaces in your file or folder names. If you need to indicate a space, use an underscore. Following is an underscore _
Interested in learning more about html? Although not a part of this course, you may want to take my do-it-yourself html course: http://dvaughan.bol.ucla.edu/a_html/Links.html. The exercises are self-explanatory. I am sorry, but I will not be able to evaluate your work on them, so please do not send me the files even though the exercises instruct you to do so.
Add an image to your file using the WYSIWYG editor
We will now change the file you just uploaded by adding an image to it.
- In the 50Webs File Manager click on the Edit button
for the page.html file.
- Select WYSIWYG.
- Click at the end of your name. Press the Enter key
on your keyboard to go down another row. You
should then be on a blank row.
- Type in the words: Ruins at the Acropolis
- Press the Enter key again.
- In the toolbar at the top of the page, click on the button
that looks like a tree. It's between the anchor and brush buttons.
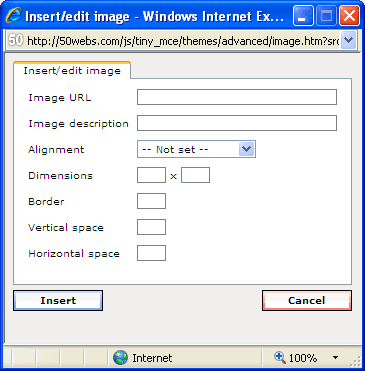
- The Insert/edit dialog box will open:
- Copy the Web address below by first clicking and dragging
over the address to select it. Then right-click and
select Copy:
http://www.pics4learning.com/catalog/m/meg005.jpg - The above is an example of an absolute path, meaning that it is a full Web address with a path to a specific location. Such a path is also called a URL or Uniform Resource Locator.
- FYI, the web site this image is from
is dedicated to providing images for use by students
and educators at no cost, Pics4Learning: http://www.pics4learning.com/
- Now paste the Web address into the Image URL field in the Insert/edit image dialog
box .
- Then click on the Insert button at the bottom of the dialog
box.
- Then click the Save file button at the bottom of
the WYSIWYG editor.
- Check the page in your browser to be sure that the image
appears and that it looks OK.
Note that sometimes the image appeared in the editor but then after I saved the file, the image would not appear on the web page. I looked in the code and noticed in the Image URL area that the url had extra characters added at the end. If this happens to you, go back into the editor, select the image (or the outline of where is is supposed to be), click on the tree button, and look at the end of the Image URL. Then manually remove the characters if they are there. You may need to do this a couple of times.
Assignments:
- Regarding the above:
- I will look at your index.html file
and also your page.html file.
- I suggest you check them first yourself.
- Go to your
web address. You ought to automatically see your home
page (index.html) as modified by you.
- Then add at the end of the web address the
following: /page.html ...then
press Enter on your keyboard. You ought
to see the page.html Web page, the one
with your name on it.
- I will look at your index.html file
and also your page.html file.
- Now you will provide me with a critique of a training video
provided by the 50Webs folks. You will put the critique in
a new html file you create below.
- In the File Manager create a new file and name it critique.html
- In the upper left area of the File Manager you will
see the following:

- Select the Empty file radio button.
- Make sure that you name the file exactly as shown.
- In the upper left area of the File Manager you will
see the following:
- As soon as you click on CREATE! the empty page will open in the WYSIWYG editor.
- Now, do the following and as you do add your comments to
the empty file.
- Use the toolbar to create bullet points, bold text, etc., as you feel is appropriate.
- Please do not use other programs to generate this page!
- In a separate browser window, go to your 50Webs HOME. Click
on the HOME button
in the upper left corner at your 50Webs :
- In the group of icons that appears, select the Help Center icon.
- Click on the link for the video about Using File Manager.
- Watch the video and make notes about what you liked and didn't like, what worked for you, did anything confuse you, etc. If the video didn't play well, or worked only partially, tell me about it.
- Compare the video with the text instructions written in this document about the File Manager. They cover different aspects of the File Manager, but you ought to be able to make a comparison. Which did you like better and why?
- Write at least 300 words in your answer.
- In the File Manager create a new file and name it critique.html
- In Step 18 in the top section of this page I provided a bit of a usability critique. Please provide your own thoughts and suggestions on how the usability problem I addressed there might be best resolved, in your opinion. Please read that section again and provide some suggestions in your critique.html file.
- Finally, send me your 50Webs username in an email.
- For the subject line of the email please enter the following (replace "name" with your last name):
- Subject: 50Webs - name - (then add your course code here)
That's it for this assignment. Whew!